
JUMP TO:
What you need
Building the Platform
Building the Motor Arm
Building your Ghost
Back to Halloween Section
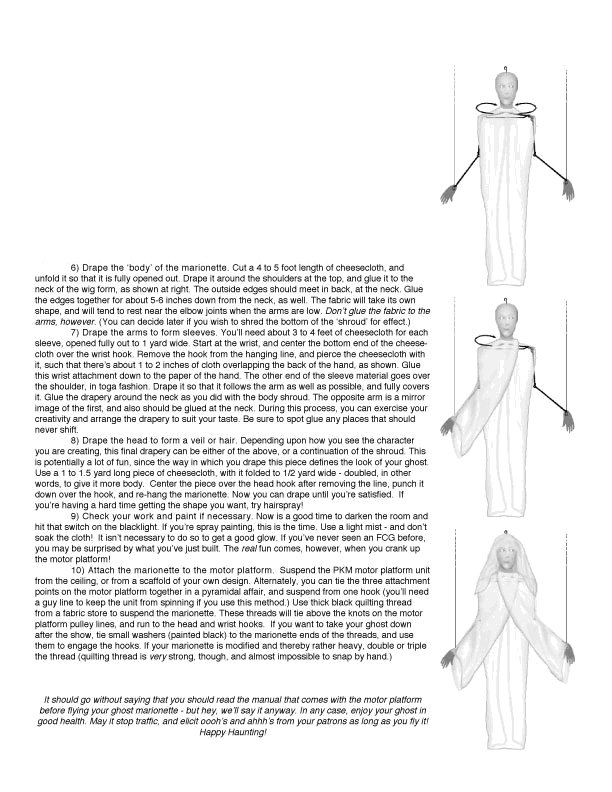
This is Kick The Fog's version of the Flying Crank Ghost made famous by the originators Phantasmechanics.com.
I must add, that this was my first attempt at the Flying Crank Ghost. I used 3 different sets of instructions from 3 different web sites. Between the 3 sets I combined the easiest elements of each and have made the following set of step by step instructions.
I hope you find them both useful and easy to understand!
SO...let's get "cranking".
You need to order a Motor for your ghost. I chose
the same one that Phantasmechanics.com used which was the
Dayton
model 2Z806 gear motor. I figured that they have
been building and running these things longer than anyone and
have obviously
"proven" this motor to be a good, long lasting one. I ordered it from
www.grainger.com. Grainger is a
wholesaler so you have to be a company to buy from them. I've heard they
let you buy products from them using cash and a company name that you work for
as long as that company you work for has an account with Grainger.
CLICK HERE for more info on the Dayton 2Z806.
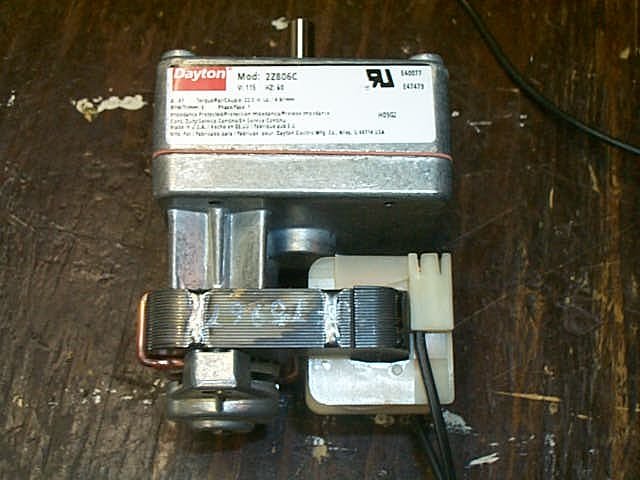 (Dayton model 2Z806)
You need to buy the other necessary parts. I bought a lot more, most of which was not needed. This was because I was going on 3 different sets of instructions and wasn't sure what exactly I needed but didn't want to make 100 trips to the hardware. The following is a list of what was needed to build my ghost.
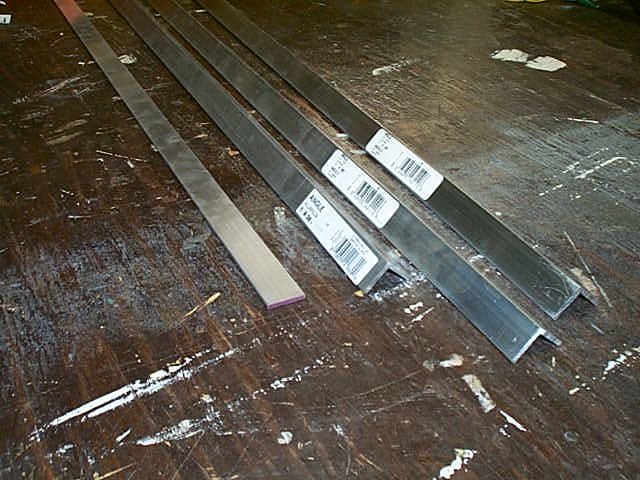 (Aluminum stock before cutting)
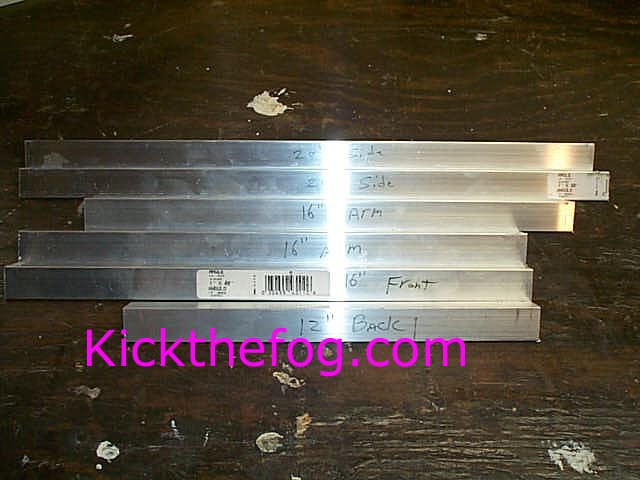
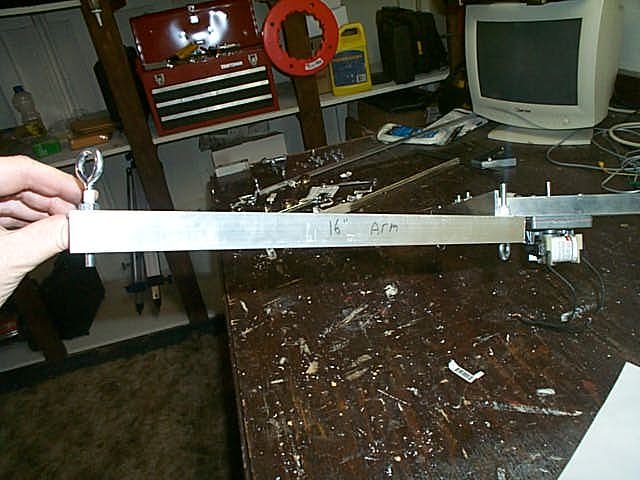
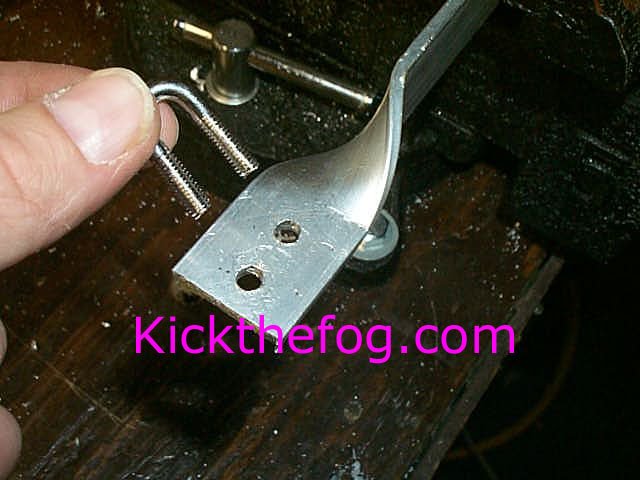
8.5 Feet of Aluminum 1" angle stock. It needs to be 1/8" thick. Make sure that each angle is 1" wide. DO NOT use the 1/16th thick stock. It is half the cost but it WILL flex under the strain and will not work well. A big question I had here was... what are the lengths going to be in the end because everywhere I went I couldn't find an 8.5' piece of aluminum. So keep in mind that you will be cutting the Aluminum into (2) 20" pieces, (3) 16" pieces, and (1) 12" piece. So I ended up buying (2) 4 foot and (1) 3 foot piece which gave me extra as well. (see picture).
(1) flat piece of 1/8" thick aluminum at least 12" long. (also pictured above)
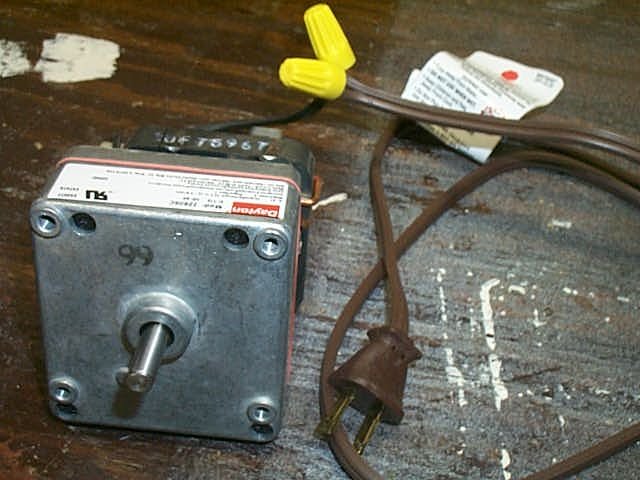 (motor and extension cord already connected with wire nuts)
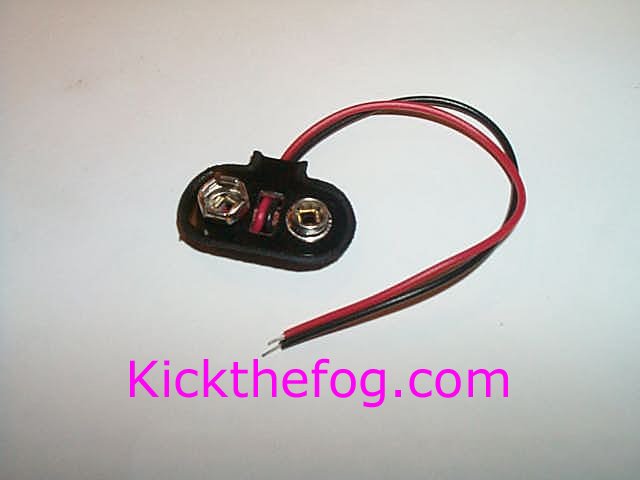
(1) cheap household 9 foot extension cord. This will be used for powering your motor.
(2) Wire Nuts to attach the cord to your motor after you cut the end of your extension cord off. (see picture)
(4) #10 X 1/2" bolts. These will be used to mount the motor to the aluminum. They go into the motor on the same side as the shaft (see picture above. Bolts not shown, just the 4 holes in motor where bolts go)
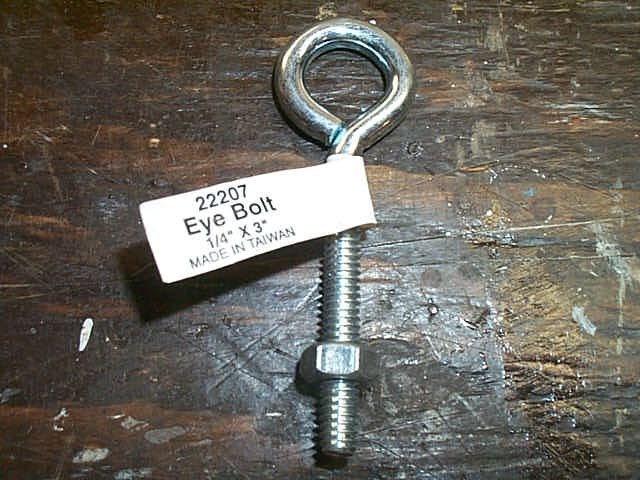 (1/4" X 3" Eye Bolt with nut)
(7) 1/4"x 3" Eye Bolts. If they come with nuts, GREAT. If they do not, buy 7 additional 1/4" nuts...one for each eye bolt.
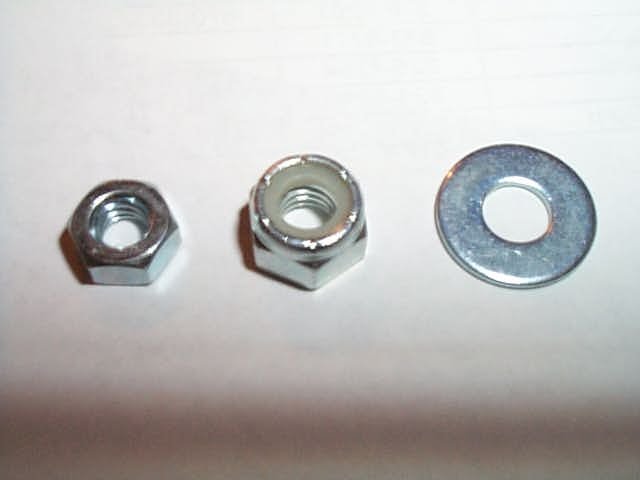 (regular nut, nylon filled nut, and a regular 1/4" Flat
Washer)
(regular nut, nylon filled nut, and a regular 1/4" Flat
Washer)
(11) regular 1/4" nuts. (18 total if your Eye bolts didn't come with them already)
(9) Nylon filled 1/4" lock nuts. You can replace every regular nut with a nylon filled if you'd rather.
(4) 1/4" Flat Washers.
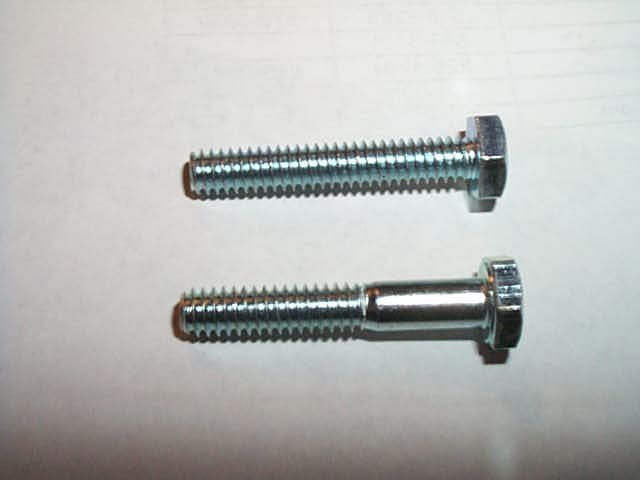 (regular
and full thread 1/4" X 1 1/2" bolts)
(regular
and full thread 1/4" X 1 1/2" bolts)
(4) 1/4" X 1 1/2" Bolts.
(1) 1/4" X 1 1/2" Full Thread Bolt.
 (Fender Washer)
(1) Fender 1/4" X 1 1/2" Fender washer or larger
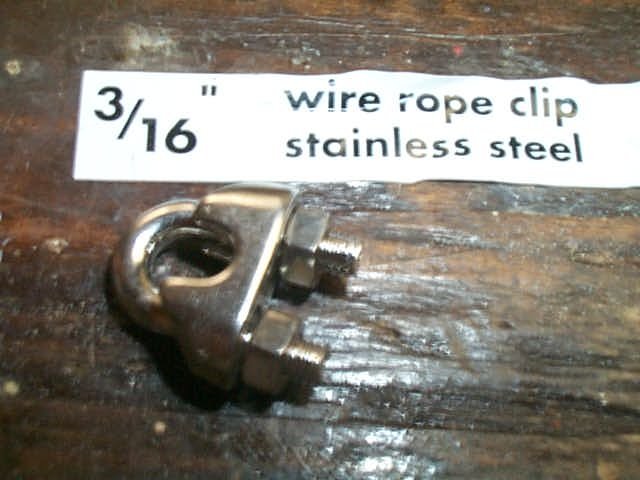 (3/16" Wire Clamp)
(1) 3/16" Wire Rope Clamp
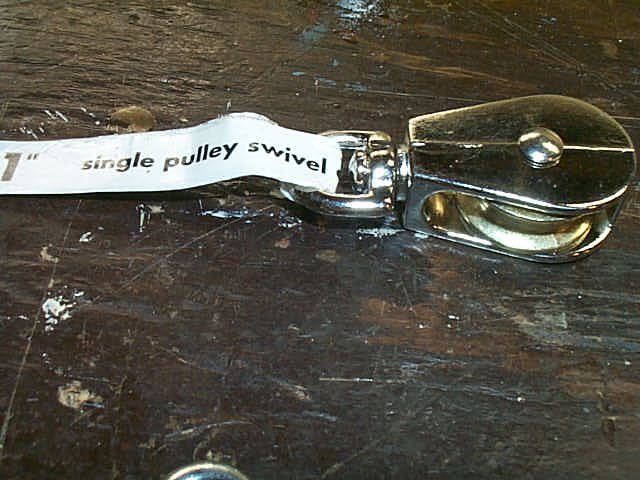 (1" Swivel Pulley)
(3) 1" Swivel Pulleys (You may not use 2 of them but better get them now to save you a trip later.)
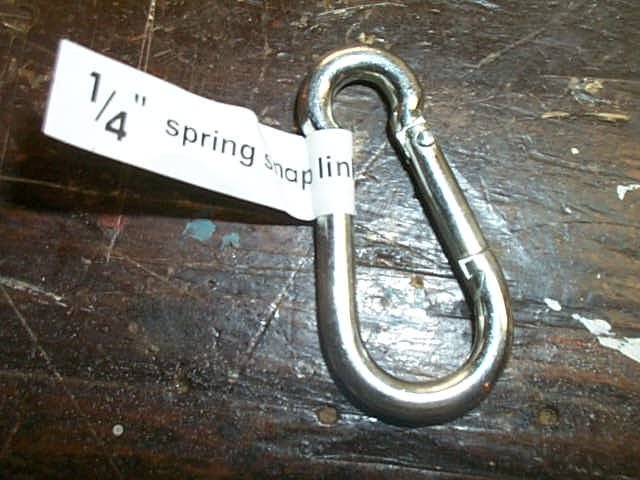 (1/4"
Spring Quick Connect)
(1/4"
Spring Quick Connect)
(7) Spring Quick Connect Clips. (You may not use all of them depending on which option you choose later on but they are cheap and better to get them now and save a trip to the hardware later.)
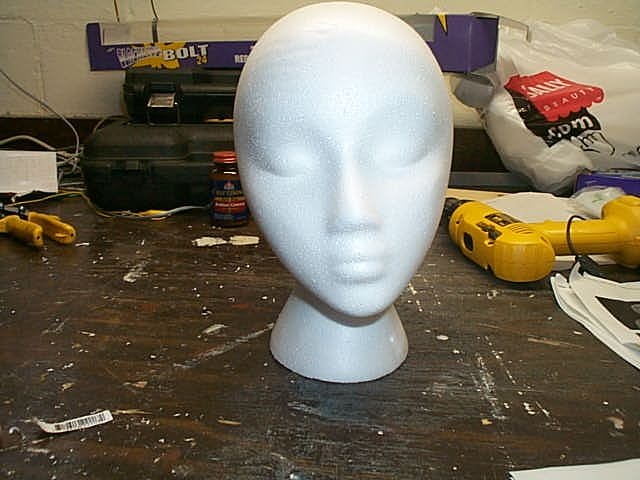 (Wig
Stand bought from a Beauty Supply Store in Town)
(Wig
Stand bought from a Beauty Supply Store in Town)
(1) Styrofoam Head (Wig Stand)
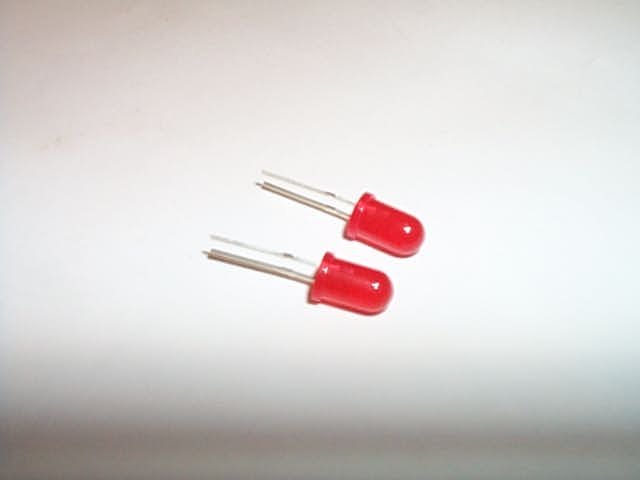 (2
red Led's or any color you prefer for the eyes. Some people think Green
"Kicks")
(2
red Led's or any color you prefer for the eyes. Some people think Green
"Kicks")
(2) Red Led's. (available at Radio Shack)
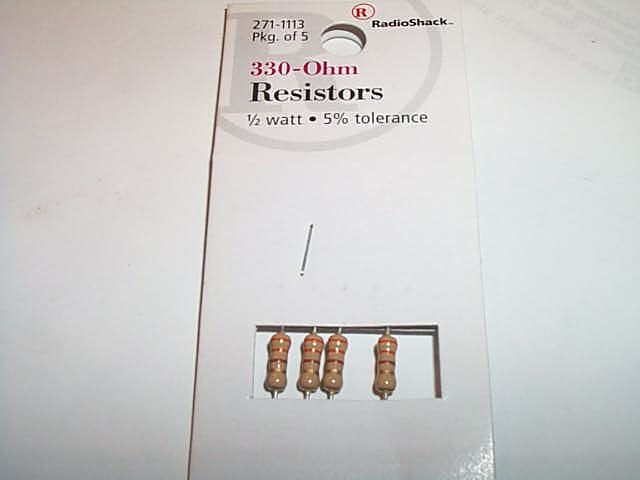 (330
Ohm 1/2 Watt Resistors)
(330
Ohm 1/2 Watt Resistors)
(1) 330 Ohm Resistor. (available at Radio Shack in a pack)
 (9
volt battery snap)
(9
volt battery snap)
(1) 9 volt battery snap (available at Radio Shack in a pack)
About 5' of hook up wire or other wire. This will be to wire the LED's for the eyes.
(10) Yards of Cheesecloth. Make sure it is the wide stuff. (nearly 3 feet wide by a 10 yard length) Do not buy the prepackaged stuff which is narrow. (available at any fabric store). People say they have done this with 6-7 yards but I have no idea how if you plan to make hair for your ghost also. If you are going to use a mask or something different for the head, perhaps you can get away with 6-7 yards but I used just under 10 yards to get the effect I wanted.
 (Clear
Tacky Glue, 4 oz Bottle)
(Clear
Tacky Glue, 4 oz Bottle)
Tacky Glue or other water based fabric glue that dries clear The tacky glue works really well even when thinned. (which we will be doing).
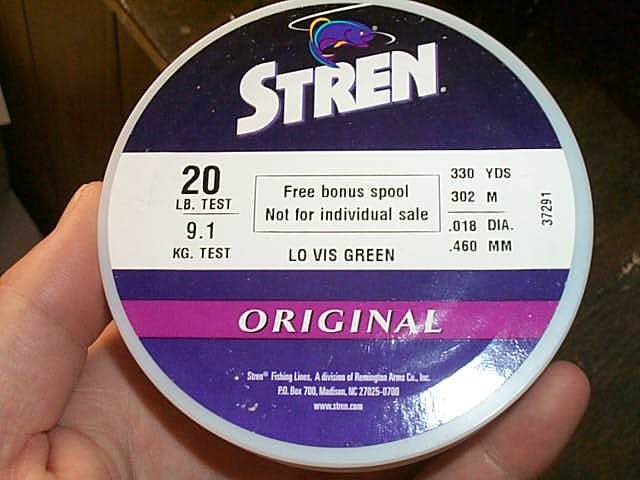 Green
Fishing Line or other line that is invisible in the dark and will not
glow under black light.
Green
Fishing Line or other line that is invisible in the dark and will not
glow under black light.
5 or 6 completely wire coat hangers (the old kind, not plastic or with cardboard on them)
(1) cup of Laundry Detergent and (1) bucket (to soak the cheesecloth in) (Everybody's got this)
 Fluorescent
Black light. I bought a 36" but a 24" or perhaps even a 12" might be ok.
The 36" gives off more than enough light. I buy only the
fluorescent tube black lights. The incandescent, (regular style bulbs)
don't work worth a crap. (they used to work well back in the 70's and early
80's. not sure why they don't work now...anybody know? just curious)
Fluorescent
Black light. I bought a 36" but a 24" or perhaps even a 12" might be ok.
The 36" gives off more than enough light. I buy only the
fluorescent tube black lights. The incandescent, (regular style bulbs)
don't work worth a crap. (they used to work well back in the 70's and early
80's. not sure why they don't work now...anybody know? just curious)
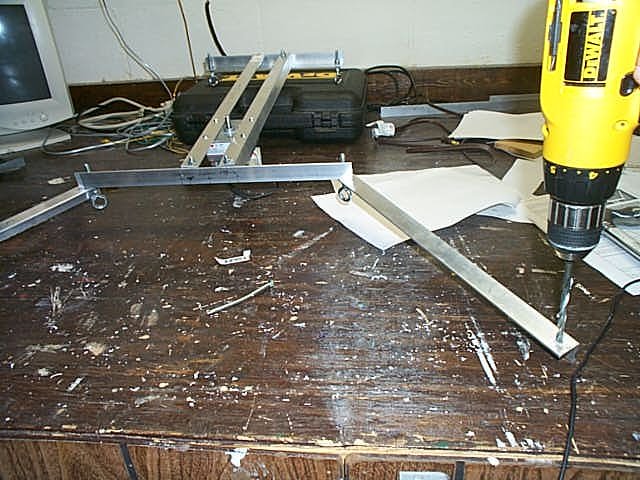
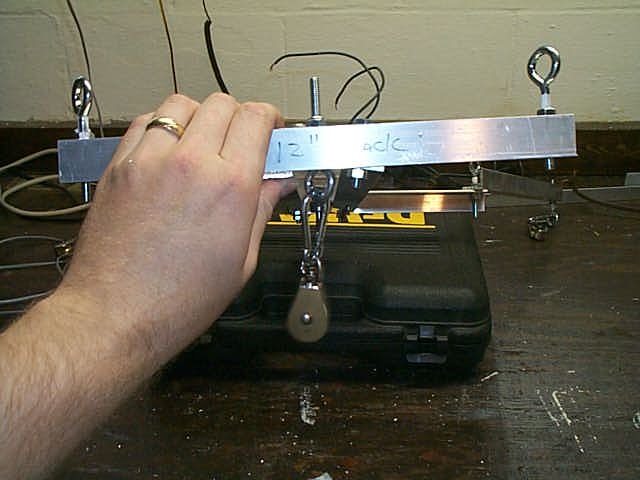
Building the Motor Platform (Framework)
 Cut
the Aluminum stock into the following pieces and mark them. (see pic)
Cut
the Aluminum stock into the following pieces and mark them. (see pic)
(2) 20" Pieces
(3) 16" Pieces
(1) 12" Piece
 Now
we're going to drill
2 holes in each section of angled Aluminum so they can be assembled as shown in
the picture. This takes some calculation and some thought BEFORE DRILLING.
Everything must be centered on itself. Let's go!
Now
we're going to drill
2 holes in each section of angled Aluminum so they can be assembled as shown in
the picture. This takes some calculation and some thought BEFORE DRILLING.
Everything must be centered on itself. Let's go!
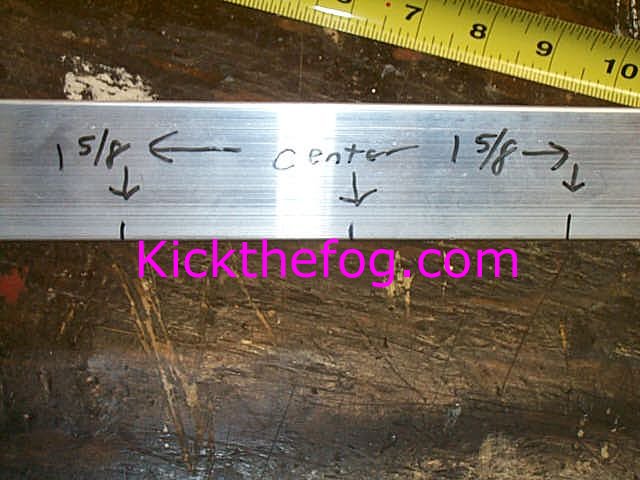
Take the 16" front piece and mark the exact center on it. Since it is 16", 8" from one end will be the center point. After marking the center point on the front 16" piece, put this aside for the moment.
Get the (2) 20" pieces. These 20" rails will be pointing up to
"cradle the motor". With the Dayton 2Z806 Motor sitting in between (being
cradled) by the aluminum, you measure the width from outside aluminum edge to
outside aluminum edge. If you are using a 2Z806 Motor and 1/8 Aluminum like you
are supposed to, it will measure 3 1/4" wide (with a little necessary extra
space). Divide 3 1/4" by 2... and you come up with 1 5/8".
 Now...
Pick up your 16" Front piece and measure 1 5/8" out from the center point that
you marked a few moments ago. This is where the edge of the aluminum will
be. Mark it so.
Now...
Pick up your 16" Front piece and measure 1 5/8" out from the center point that
you marked a few moments ago. This is where the edge of the aluminum will
be. Mark it so.
 Now
on the 16" front piece, from the outer edge you just marked, Measure inward 1/2"
towards the center (half the width of the aluminum). This is dead center.
Drill a hole with a 1/4" drill bit here. As you can see, I did the right
side already and if you look closely you can see how I marked it and found my
drilling locations on the front of my 16" piece. You can clamp the pieces
together for drilling the first hole. A block of wood in between the 2 pieces of
aluminum may help you to keep the Aluminum from shifting since they do not fit
well together.
Now
on the 16" front piece, from the outer edge you just marked, Measure inward 1/2"
towards the center (half the width of the aluminum). This is dead center.
Drill a hole with a 1/4" drill bit here. As you can see, I did the right
side already and if you look closely you can see how I marked it and found my
drilling locations on the front of my 16" piece. You can clamp the pieces
together for drilling the first hole. A block of wood in between the 2 pieces of
aluminum may help you to keep the Aluminum from shifting since they do not fit
well together.
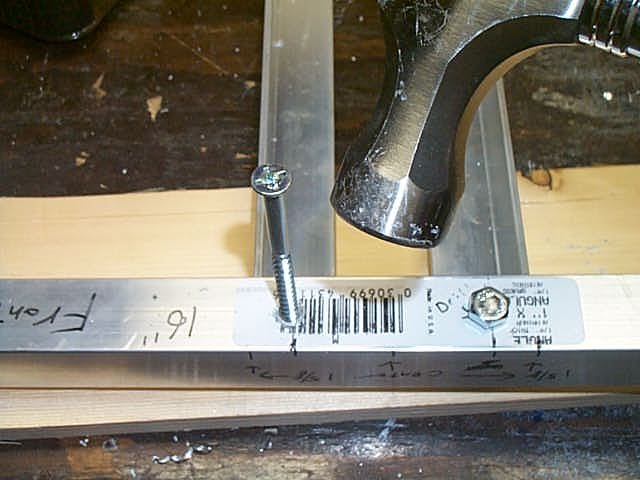
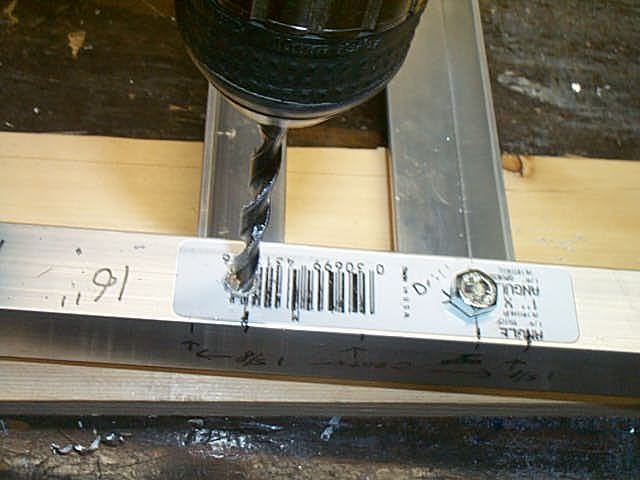
 AN
EASY WAY TO MARK AND DRILL these is to only drill the Front (top) piece first.
Then use a screw or punch to make a mark for drilling. Do this by inserting a
screw or punch into the top hole you just drilled and use a hammer to hit the
screw or punch. This will make a mark on the aluminum underneath and give
you a great mark as to where to drill. This way you do not have to try and drill
all the way through BOTH pieces and have them jumping all over the place.
AN
EASY WAY TO MARK AND DRILL these is to only drill the Front (top) piece first.
Then use a screw or punch to make a mark for drilling. Do this by inserting a
screw or punch into the top hole you just drilled and use a hammer to hit the
screw or punch. This will make a mark on the aluminum underneath and give
you a great mark as to where to drill. This way you do not have to try and drill
all the way through BOTH pieces and have them jumping all over the place.
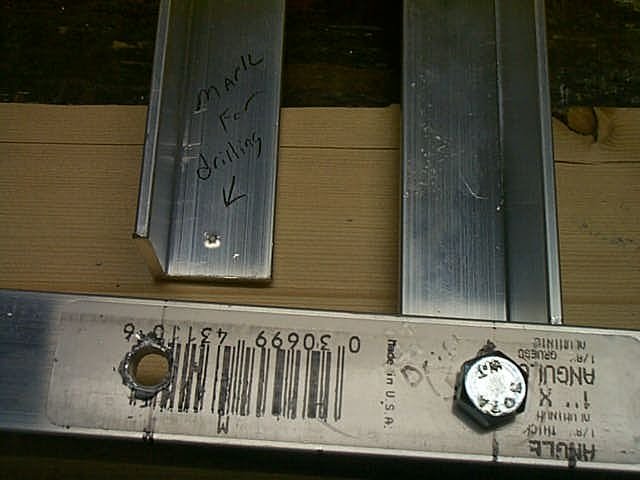
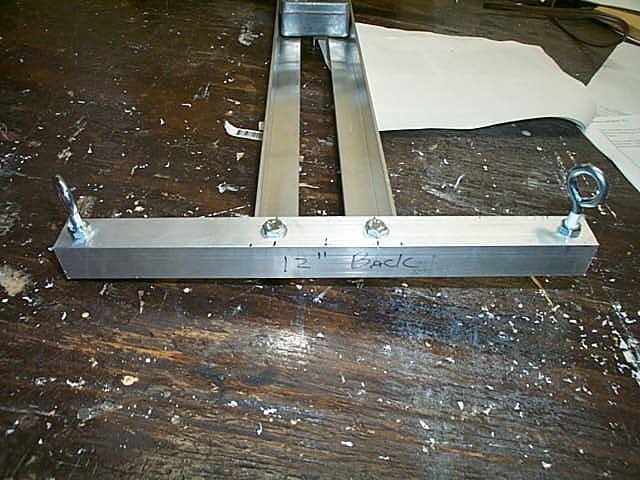
Do the Exact Same thing you just did for the front for the rear 12" piece.. You must measure and drill exactly like you just did for the front. You can start over at Step 2 and just substitute the 12" rear piece wherever you see the 16" front piece mentioned and you'll be fine. (So instead of marking the 16" piece at it's 8" center... you will me marking a 6" center in the middle of the 12" back piece.) All other measurements still apply. Nothing else has changed so just do them exactly like you did the front.
 After
you have all holes marked and drilled, assemble all 4 Pieces together using (4)
1/4" X 1 1/2" Bolts and (8) regular nuts. DO NOT TIGHTEN ANYTHING YET...
just put it together. You use 2 nuts per bolt to keep the aluminum from turning
and collapsing on itself when you tighten the bolts. Although I think some
degree of twist is inevitable. Mine ended up having twist in it and it doesn't
affect the operation of it so don't get crazy struggling to keep it from
twisting. It doesn't need to be real tight so find a happy medium.
After
you have all holes marked and drilled, assemble all 4 Pieces together using (4)
1/4" X 1 1/2" Bolts and (8) regular nuts. DO NOT TIGHTEN ANYTHING YET...
just put it together. You use 2 nuts per bolt to keep the aluminum from turning
and collapsing on itself when you tighten the bolts. Although I think some
degree of twist is inevitable. Mine ended up having twist in it and it doesn't
affect the operation of it so don't get crazy struggling to keep it from
twisting. It doesn't need to be real tight so find a happy medium.
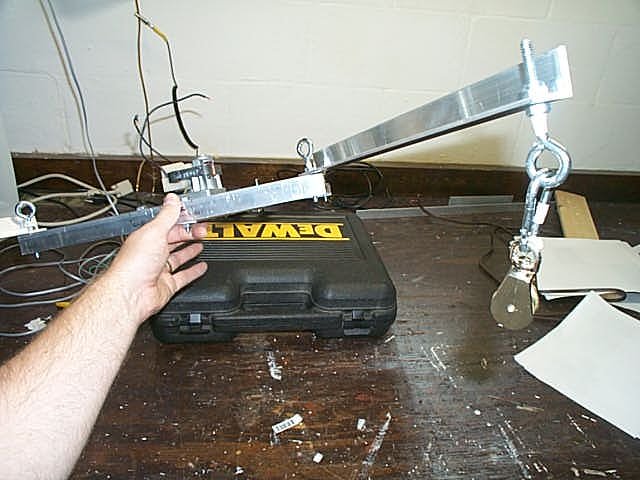
You
now have a built (but not tightened) frame and you're ready for Motor Mounting.
 Time
to mount the motor. I used a piece of paper and placed it over the motor
shaft and pressed an imprint of the mounting holes into the paper. Look
carefully and you can see the marks.
Time
to mount the motor. I used a piece of paper and placed it over the motor
shaft and pressed an imprint of the mounting holes into the paper. Look
carefully and you can see the marks.
 Cut out a square of the paper with the imprints the same size as the motor. Make
holes in the center of the paper hole imprints using a knife or screw.
Cut out a square of the paper with the imprints the same size as the motor. Make
holes in the center of the paper hole imprints using a knife or screw.
 Place the paper into the frame so that the edge of the paper is 3 1/2" from the
front edge. (The idea is to end up having the front end of the motor 3 1/2" from
the front edge of the aluminum)
Place the paper into the frame so that the edge of the paper is 3 1/2" from the
front edge. (The idea is to end up having the front end of the motor 3 1/2" from
the front edge of the aluminum)
 Use
a permanent marker to mark the 4 Motor Mount hole locations on the Aluminum.
make sure you do not move the paper after you begin marking. (understand
that the entire assembly is still loose at this point and that's good. It
will give you some slack when it comes time to line up the Motor mount holes)
Use
a permanent marker to mark the 4 Motor Mount hole locations on the Aluminum.
make sure you do not move the paper after you begin marking. (understand
that the entire assembly is still loose at this point and that's good. It
will give you some slack when it comes time to line up the Motor mount holes)
 Drill
the 4 holes you just marked with a 5/32 inch drill bit and enlarge if necessary.
I had to enlarge mine with a 3/16 drill bit because I must have moved the paper
a bit while marking (they didn't quite line up even with being able to move the
aluminum)
Drill
the 4 holes you just marked with a 5/32 inch drill bit and enlarge if necessary.
I had to enlarge mine with a 3/16 drill bit because I must have moved the paper
a bit while marking (they didn't quite line up even with being able to move the
aluminum)
 Use
your (4) #10 X 1/2" bolts to secure the motor to the frame and tighten.
Now you can go around and tighten all the other bolts/nuts and the frame will be
nice and rigid. Do not over tighten or you will bend and flex the Aluminum
and put extra stress on the little motor mount bolts.
Use
your (4) #10 X 1/2" bolts to secure the motor to the frame and tighten.
Now you can go around and tighten all the other bolts/nuts and the frame will be
nice and rigid. Do not over tighten or you will bend and flex the Aluminum
and put extra stress on the little motor mount bolts.
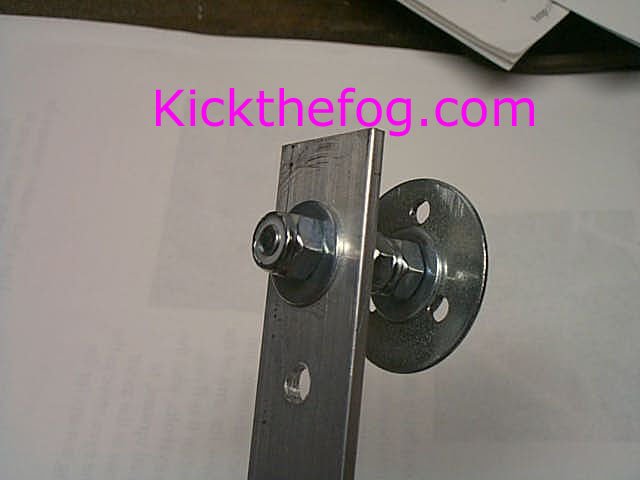
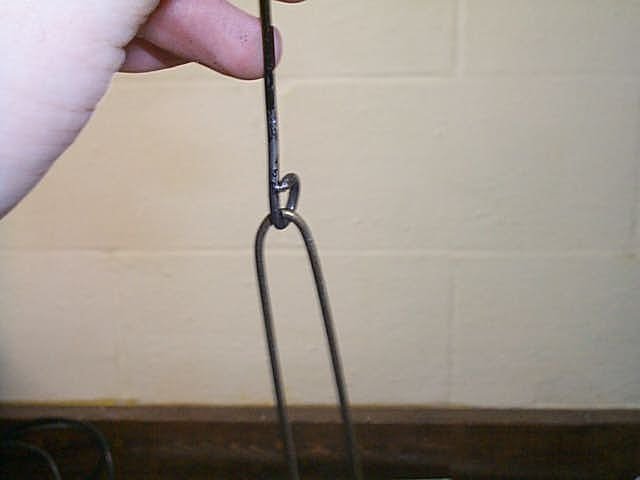
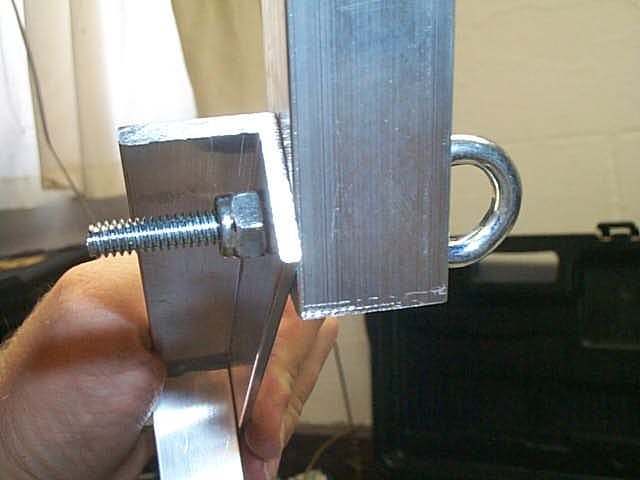 Let's
mount the arms. Using your 1/4" drill bit, drill a hole at the edge of one
of the arms. It doesn't really matter where. I measured a 1/2" in
from the end and of course, 1/2" in from the side so the hole was in the center
of the aluminum. Drill your hole there. Do the same thing for
the ends of the 16" front piece. Then fasten them together using an Eye
bolt with the eye pointed upward. (the motor shaft points to
the underside of the frame in case your having trouble knowing which side
is up and which is down) This eye bolt will be one of your mounting
points from the ceiling. As you can see in the left picture, to assemble, you
screw the regular nut that came with the eye bolt all the way on to act as a
"stopper". Then you tighten on (1) 1/4" nylon nut to hold the two pieces
together. The nylon works VERY well here because you will want to leave the
eyebolt quite snug but loose enough so that with some mild force you can still
move the arms without having to loosen the eyebolts. This will allow you to move
the arms back and forth for adjustment later on without loosening and tightening
and the nylon nuts won't allow them to become more loose.
Let's
mount the arms. Using your 1/4" drill bit, drill a hole at the edge of one
of the arms. It doesn't really matter where. I measured a 1/2" in
from the end and of course, 1/2" in from the side so the hole was in the center
of the aluminum. Drill your hole there. Do the same thing for
the ends of the 16" front piece. Then fasten them together using an Eye
bolt with the eye pointed upward. (the motor shaft points to
the underside of the frame in case your having trouble knowing which side
is up and which is down) This eye bolt will be one of your mounting
points from the ceiling. As you can see in the left picture, to assemble, you
screw the regular nut that came with the eye bolt all the way on to act as a
"stopper". Then you tighten on (1) 1/4" nylon nut to hold the two pieces
together. The nylon works VERY well here because you will want to leave the
eyebolt quite snug but loose enough so that with some mild force you can still
move the arms without having to loosen the eyebolts. This will allow you to move
the arms back and forth for adjustment later on without loosening and tightening
and the nylon nuts won't allow them to become more loose.
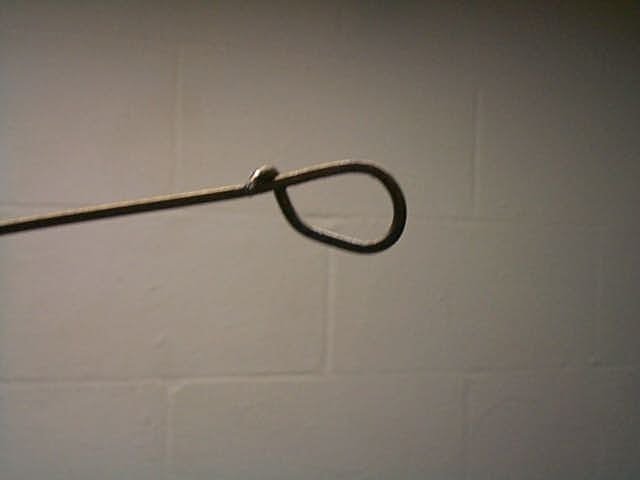
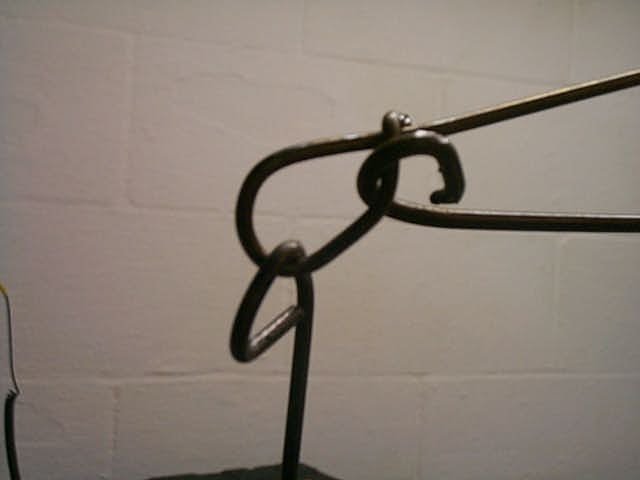
 Here
you can see in this bottom view of my frame that we have both arms
secured to the frame using eyebolts. Now we must drill holes in the ends of the
arms. Do this also with your 1/4" drill bit and center the hole on the end
like you just did to mount the arms to the frame.
Here
you can see in this bottom view of my frame that we have both arms
secured to the frame using eyebolts. Now we must drill holes in the ends of the
arms. Do this also with your 1/4" drill bit and center the hole on the end
like you just did to mount the arms to the frame.
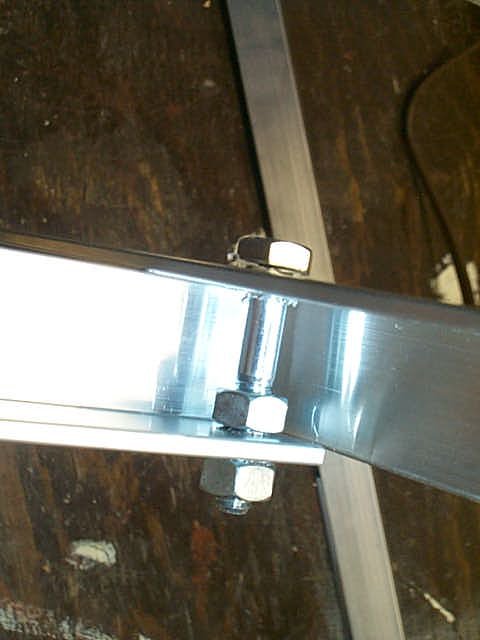
 Put
(2) eyebolts, (1) in each arm end using an eyebolt with nut screwed all the way
on to act as a stopper and a nylon nut to secure it. These eyebolts will be
facing down (pointing same direction as the motor shaft) These will support your
ghost's arms. Leave these nylon nuts just snug also so you can rotate it with
some mild force also. Adjustment will be needed later.
Put
(2) eyebolts, (1) in each arm end using an eyebolt with nut screwed all the way
on to act as a stopper and a nylon nut to secure it. These eyebolts will be
facing down (pointing same direction as the motor shaft) These will support your
ghost's arms. Leave these nylon nuts just snug also so you can rotate it with
some mild force also. Adjustment will be needed later.
 Turn
your frame around. Drill and mount 2 more eyebolts the exact same way you did
the others at the ends of the rear frame just like you did for the front.
These will be pointing upward and will serve as the mount points to the ceiling.
Turn
your frame around. Drill and mount 2 more eyebolts the exact same way you did
the others at the ends of the rear frame just like you did for the front.
These will be pointing upward and will serve as the mount points to the ceiling.
 Now
drill a 1/4" hole in the center of the 12" rear and install an eyebolt facing
down. Do this in the exact same way that you've done the others. This will
support the ghost.
Now
drill a 1/4" hole in the center of the 12" rear and install an eyebolt facing
down. Do this in the exact same way that you've done the others. This will
support the ghost.
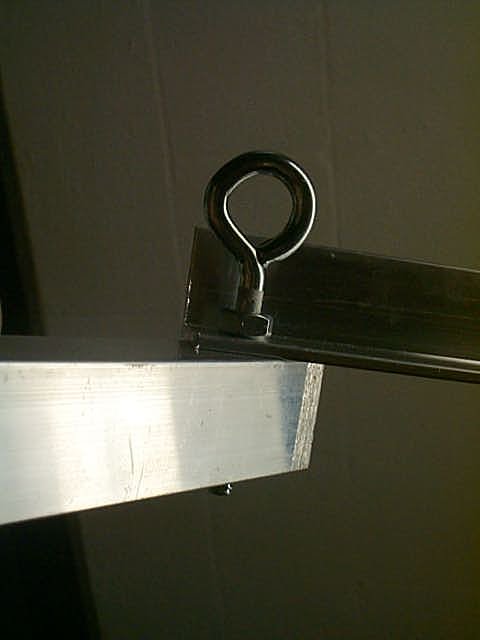
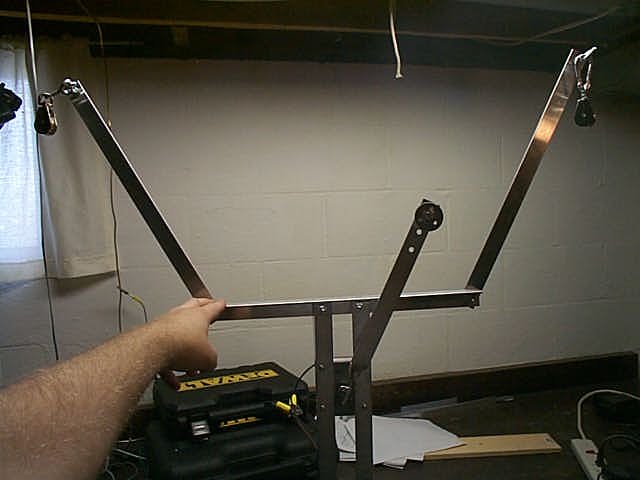
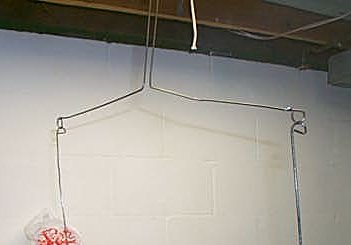
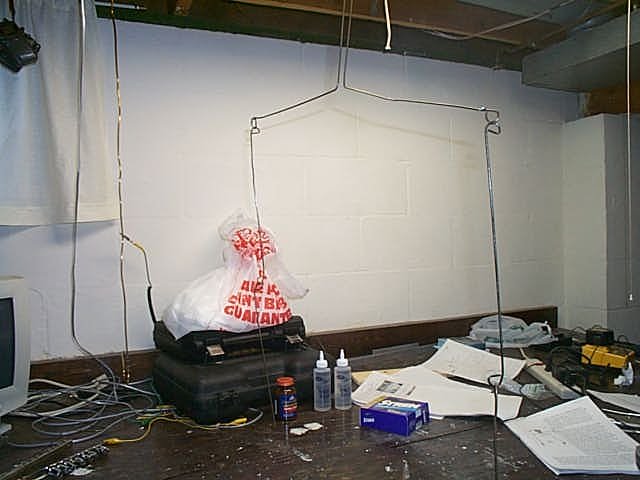
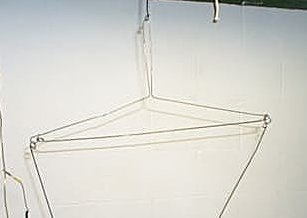
 That's
it...your frame it built! This gives you a pretty good look as to which eyebolts
are pointing up and down. The 4 eyebolts on the frame face up. The 3 eye
bolts, 1 on each arm end and the 1 in the center of the rear frame, face down.
That's
it...your frame it built! This gives you a pretty good look as to which eyebolts
are pointing up and down. The 4 eyebolts on the frame face up. The 3 eye
bolts, 1 on each arm end and the 1 in the center of the rear frame, face down.
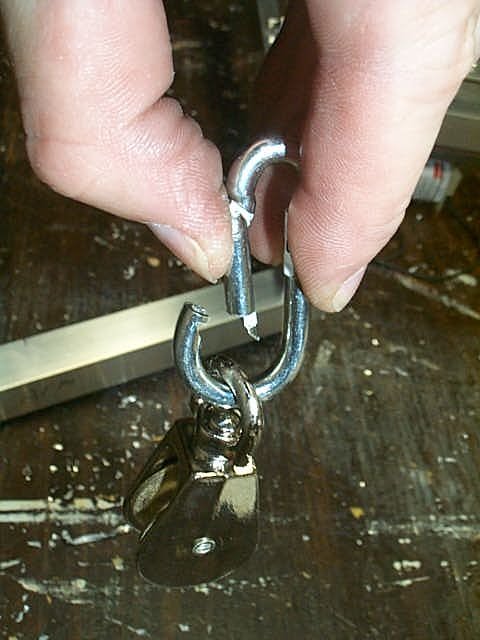
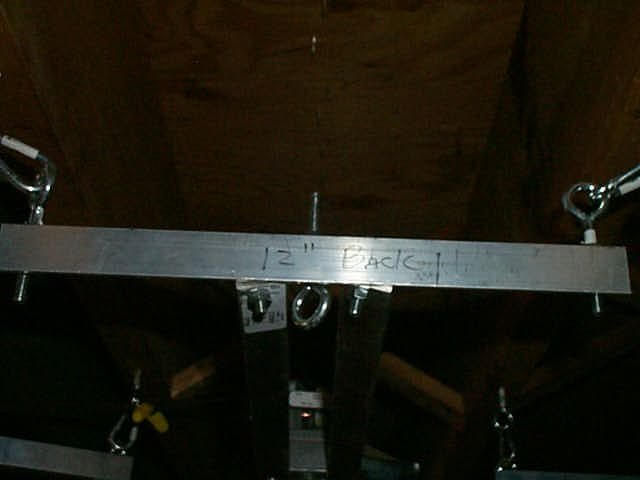
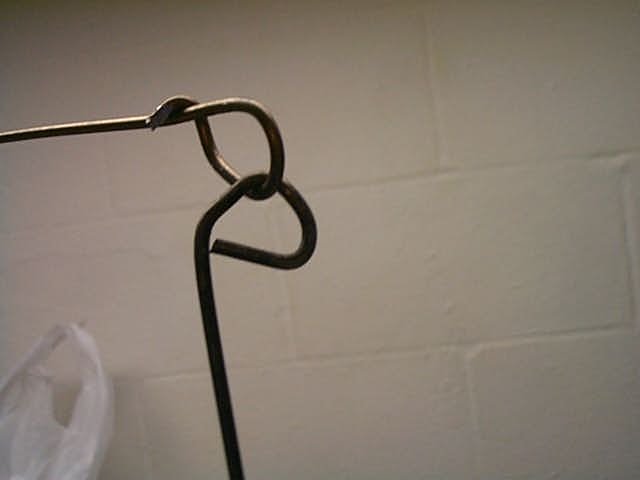
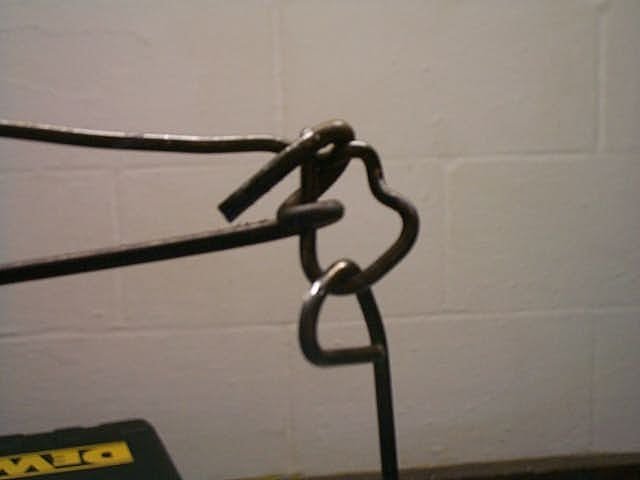
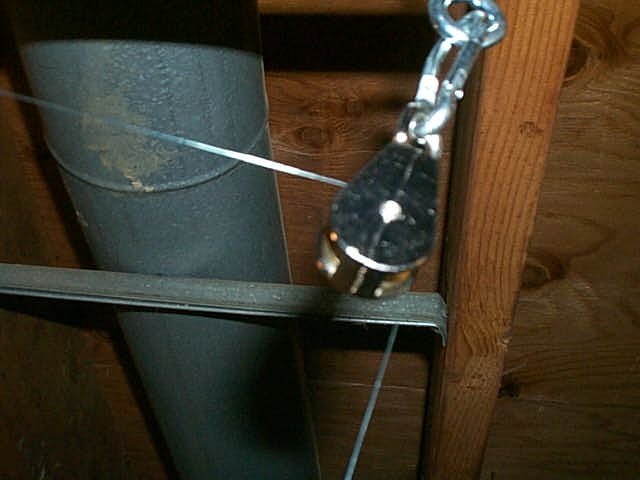
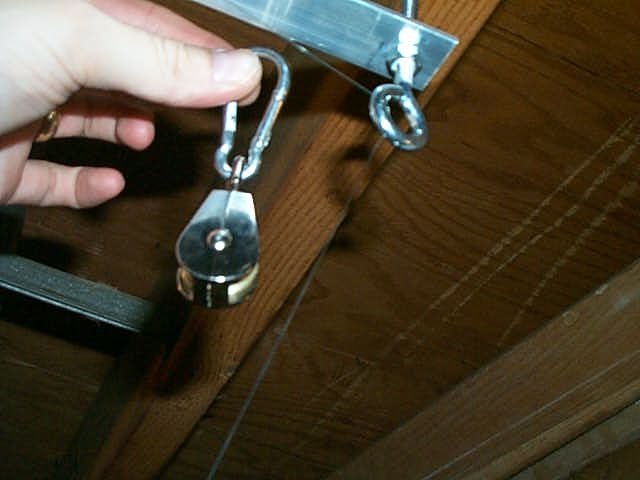
 Now
you can connect the swivel pulleys using the quick connects. Note that the picture
on the right shows the installed pulley on the BOTTOM of the end of one arm
(frame is lying upside down) (1) pulley on
each arm end and (1) on the bottom center eyebolt of rear frame.
Now
you can connect the swivel pulleys using the quick connects. Note that the picture
on the right shows the installed pulley on the BOTTOM of the end of one arm
(frame is lying upside down) (1) pulley on
each arm end and (1) on the bottom center eyebolt of rear frame.
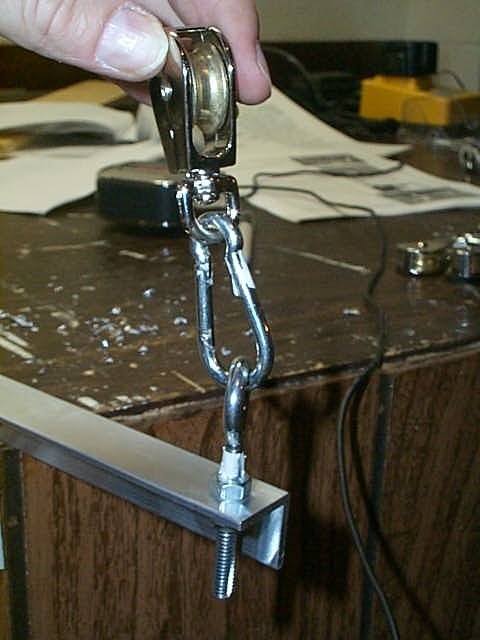
 This
is what you should end up with. Left arm pulley installed. (right side not
shown but is identical). Second picture shows rear pulley installed.
This
is what you should end up with. Left arm pulley installed. (right side not
shown but is identical). Second picture shows rear pulley installed.
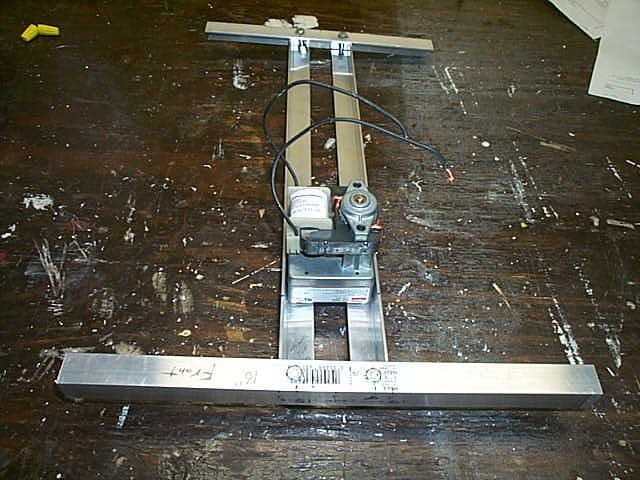
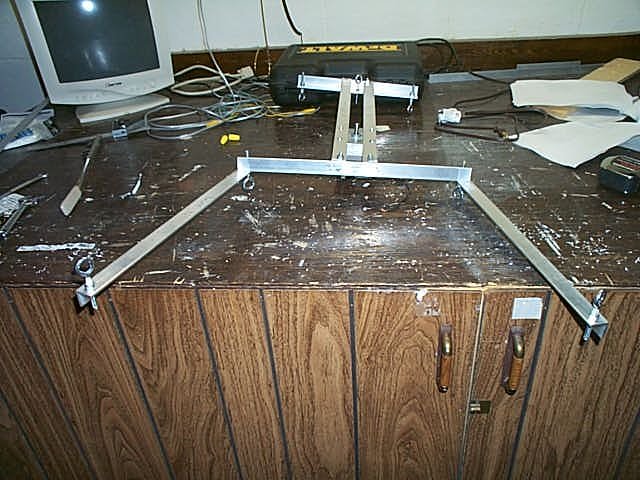
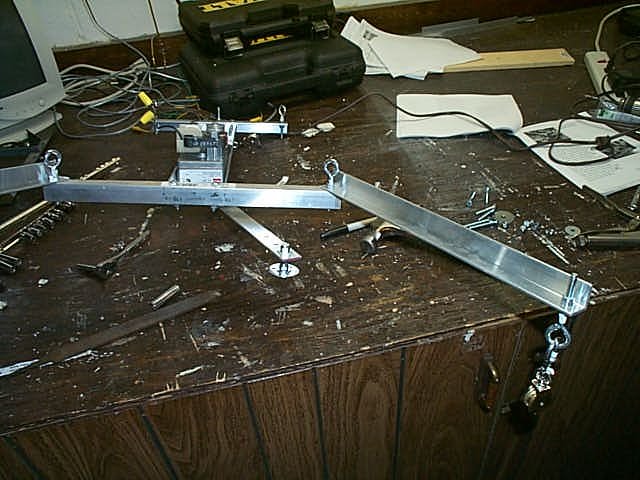
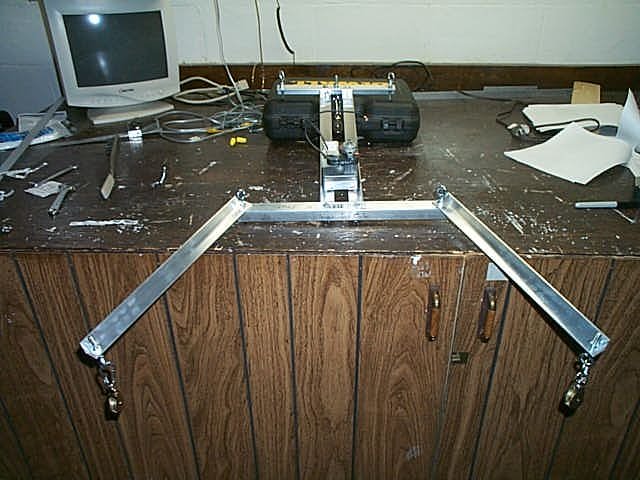 Our
completed frame with pulleys installed!
Our
completed frame with pulleys installed!
Building the Motor Arm (Crank)
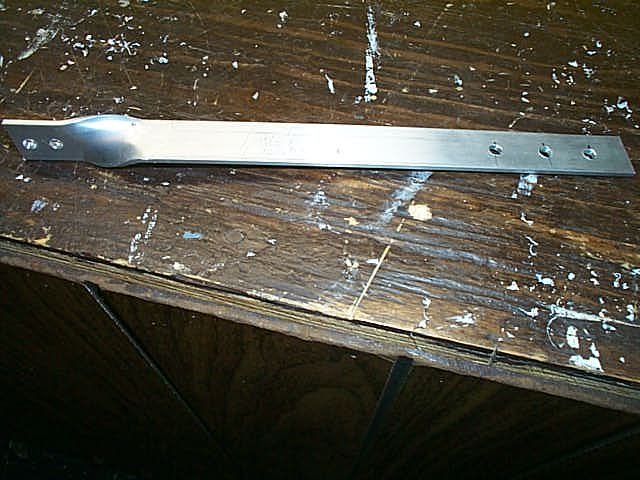
Cut a 12" length of the flat aluminum stock. This will be your motor crank.
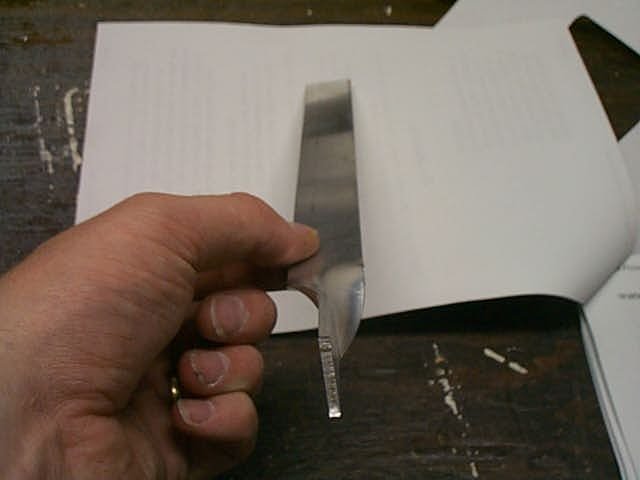 Take
your 12" cut piece of flat aluminum and place about 1 1/4" of it in a
vise. Using a pair of vise grip pliers, grip the aluminum about 1 1/2" away from
the vise. Bend the Aluminum 90 degrees. I was shocked to learn how easy it
was to bend using a vise and vise grips. Without these, I don't know how you'd
bend it easily.
Take
your 12" cut piece of flat aluminum and place about 1 1/4" of it in a
vise. Using a pair of vise grip pliers, grip the aluminum about 1 1/2" away from
the vise. Bend the Aluminum 90 degrees. I was shocked to learn how easy it
was to bend using a vise and vise grips. Without these, I don't know how you'd
bend it easily.
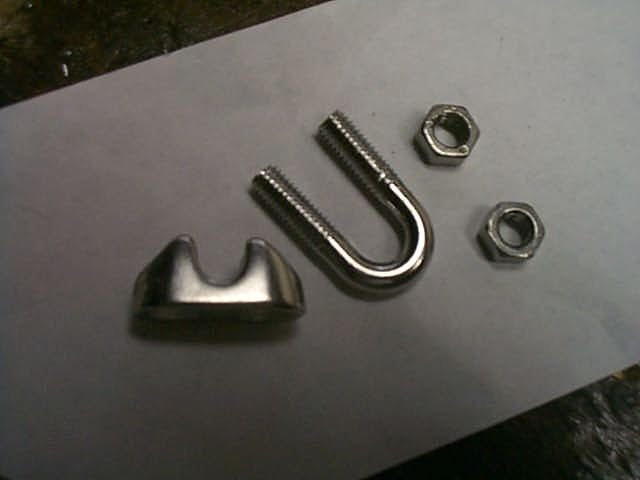 Disassemble
your wire clamp. This is what we will use to mount the crank to the motor
drive shaft. We are only interested in using the U-Bolt and the nuts. The
other funny shaped part can be tossed.
Disassemble
your wire clamp. This is what we will use to mount the crank to the motor
drive shaft. We are only interested in using the U-Bolt and the nuts. The
other funny shaped part can be tossed.
 Drill
(2) 5/32" holes in the end of the crank (the end you just bent). Since the
u-bolt is not perfectly straight, you may need to drill the holes slightly
larger or a bit closer together. The goal is to get the u-bolt to go
through the holes. Test fit the u-bolt and make sure you can get it to go in at
least half way.
Drill
(2) 5/32" holes in the end of the crank (the end you just bent). Since the
u-bolt is not perfectly straight, you may need to drill the holes slightly
larger or a bit closer together. The goal is to get the u-bolt to go
through the holes. Test fit the u-bolt and make sure you can get it to go in at
least half way.
 Now
drill (3) 1/4" holes, 1" apart in the other end of the crank. You don't
have to get crazy here. Just center the holes and make them 1" apart.
These will be your adjustment points later on.
Now
drill (3) 1/4" holes, 1" apart in the other end of the crank. You don't
have to get crazy here. Just center the holes and make them 1" apart.
These will be your adjustment points later on.
 Drill
(3) 5/32" holes in the Fender washer. The picture shows what we are going
to complete right now but notice the 3 equally spaced holes in the washer.
Drill
(3) 5/32" holes in the Fender washer. The picture shows what we are going
to complete right now but notice the 3 equally spaced holes in the washer.
 Assemble
your crank end using the 1/4" X 1 1/2" Full thread bolt. I started in
the outermost hole. This will give you the most movement. If later you
decide your ghost is moving too much, you can move the full thread bolt in
closer to the motor in one of the 2 other holes you drilled.
Assemble
your crank end using the 1/4" X 1 1/2" Full thread bolt. I started in
the outermost hole. This will give you the most movement. If later you
decide your ghost is moving too much, you can move the full thread bolt in
closer to the motor in one of the 2 other holes you drilled.
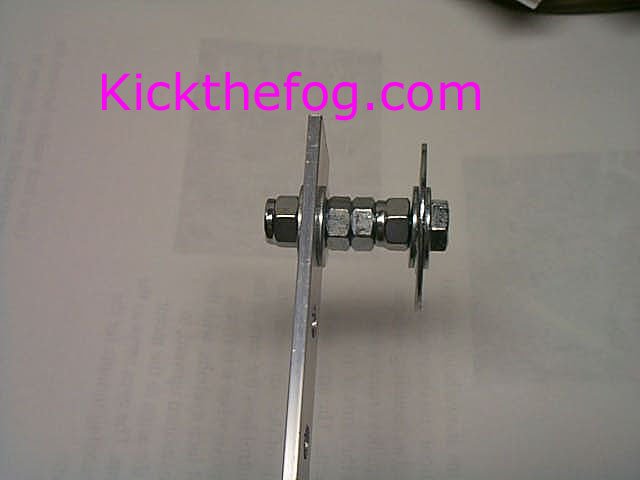
From left to right
you will see the following parts in order of assembly:
(1) 1/4" Nylon Lock Nut
(1) 1/4" Flat Washer
The Flat Aluminum (Crank)
(1) 1/4"Flat Washer
(2) 1/4" Regular Nuts
(1) 1/4" Nylon Lock Nut
(1) 1/4" Flat Washer
(1) 1/4" X 1 1/2" Fender Washer
(1) 1/4" Flat Washer
Full Threaded Head bolt. (The bolt goes in from the right)
The goal here is to have a firm tightened assembly with a spinning Fender Washer. Do this by loosening the "grip" on the Fender Washer by adjusting the relationship between the rightmost lock nut and the head of the bolt. Loosen it enough to allow the Fender Washer to turn freely but not wobble. The great thing here once again is that the lock nut will stay wherever you leave it.
You can put a tad of sewing machine or other light oil on the fender washer to cut down on wear as it rotates. Eventually this will wear out but hey, it's only a bolt and some nuts which is certainly cheap enough to replace now and then.
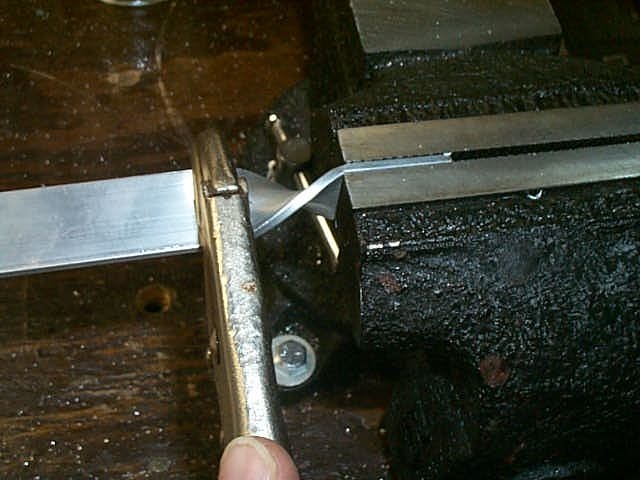
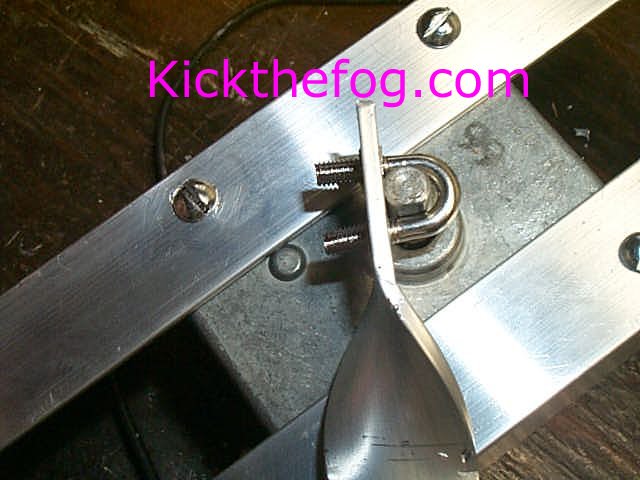 Place
the crank we just built on the motor shaft so the Fender washer hangs down.
Attach it to the motor drive shaft using the u-bolt and nuts. You'll notice that
I placed the u-bolt so that it's inside edge rests firmly on the flat edge of
the drive shaft. THIS IS IMPORTANT as to keep the crank from spinning
around the shaft. We want the Motor shaft and Crank to become "one".
Place
the crank we just built on the motor shaft so the Fender washer hangs down.
Attach it to the motor drive shaft using the u-bolt and nuts. You'll notice that
I placed the u-bolt so that it's inside edge rests firmly on the flat edge of
the drive shaft. THIS IS IMPORTANT as to keep the crank from spinning
around the shaft. We want the Motor shaft and Crank to become "one".
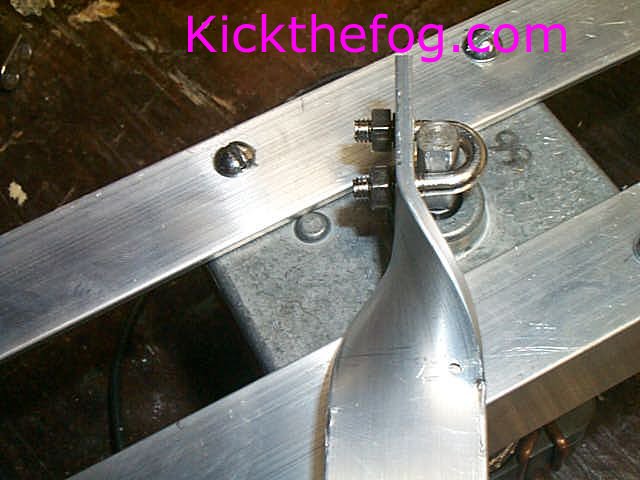
 Put
the nuts on and tighten them up. You'll notice in the first picture that I
have yet to tighten the nuts so there is a lot of space between the drive shaft
and the inside of the u-bolt. In the second picture I have them tightened pretty
good (Don't over tighten or you'll break the u-bolt!) and you can see the snug
fit between shaft and u-bolt.
Put
the nuts on and tighten them up. You'll notice in the first picture that I
have yet to tighten the nuts so there is a lot of space between the drive shaft
and the inside of the u-bolt. In the second picture I have them tightened pretty
good (Don't over tighten or you'll break the u-bolt!) and you can see the snug
fit between shaft and u-bolt.
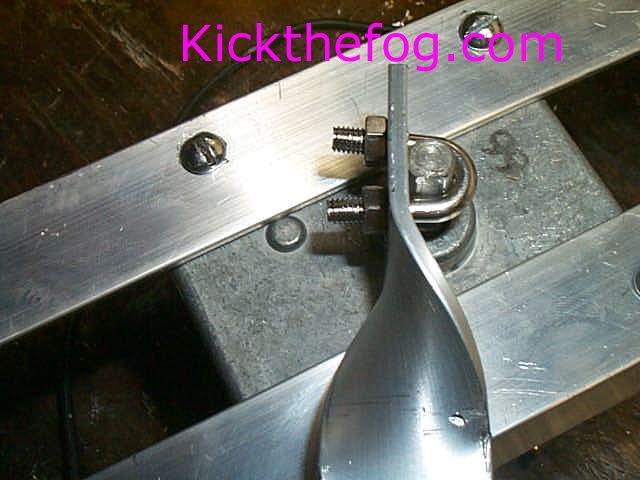
 Here
is the crank installed.
Here
is the crank installed.
Cut
the end of your extension cord off. Strip back the ends and use 2 wire
nuts to attach the extension cord to the motor if you haven't done so already. I
did this first thing as my picture shows but I later decided to take the cord
back off since it was getting in my way during construction.
Plug that baby in and make sure you have clearance and that it runs smoothly. As long as it makes it's way around without banging in to anything, you are fine.
 Start
by straightening a coat hangar out completely. I cut off the "hook" part of the
hangar. Straighten it out completely. I measured my Coat hangar and it was
41 1/2" total. I measured in 20 3/4" and marked it. This is the center of
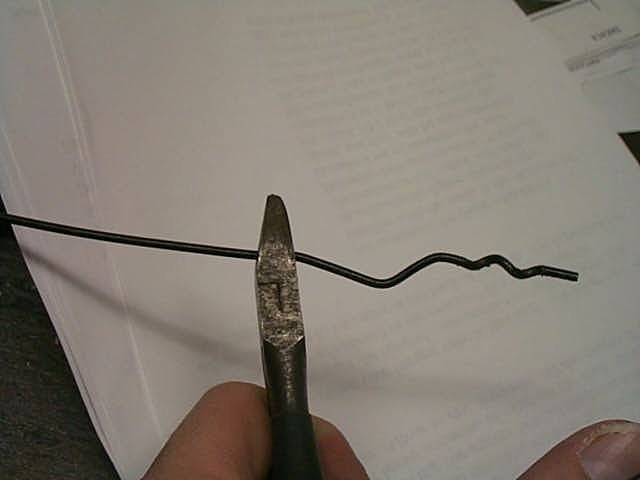
the coat hanger. Bend it in half.
Start
by straightening a coat hangar out completely. I cut off the "hook" part of the
hangar. Straighten it out completely. I measured my Coat hangar and it was
41 1/2" total. I measured in 20 3/4" and marked it. This is the center of
the coat hanger. Bend it in half.
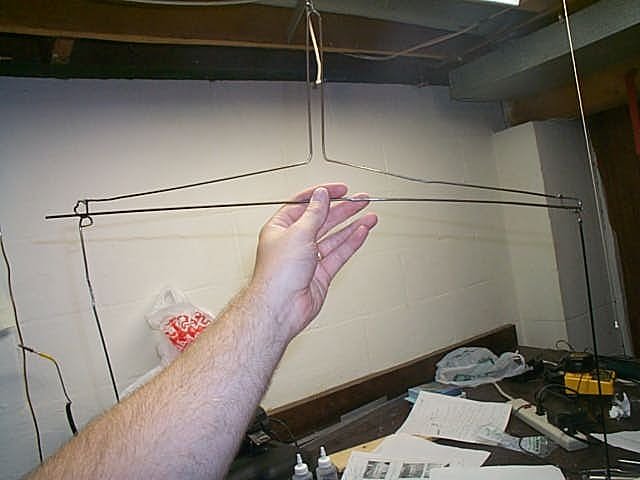
 From the top of the hangar, measure down 6" and mark the hangar on each side.
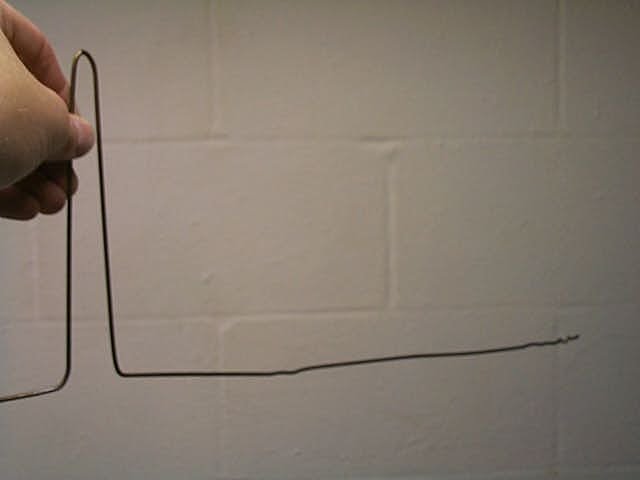 Bend
the hangar so that the 6 inches you marked remains above in a point and the
lower regions extend horizontally outward. These will be the shoulders of your
ghost and the 6" bend will be inside your Styrofoam head.
Bend
the hangar so that the 6 inches you marked remains above in a point and the
lower regions extend horizontally outward. These will be the shoulders of your
ghost and the 6" bend will be inside your Styrofoam head.
 Straighten
another hangar and make a good 2' straight piece. Take one end of the 2'
piece you just made and make a hook on one end and "hook" it around the 6"
curved section you made in step 3. Make sure that your hook or loop is
large enough to allow the individual parts to move freely without hang ups. The
picture shows only the hooked part but keep in mind that from the hooked part
upward is about 2' of straight coat hangar. This will be used to go
through the Styrofoam head from the bottom of the head out through the top of
the head and will serve as the hangar for your ghost. We'll do this later.
Straighten
another hangar and make a good 2' straight piece. Take one end of the 2'
piece you just made and make a hook on one end and "hook" it around the 6"
curved section you made in step 3. Make sure that your hook or loop is
large enough to allow the individual parts to move freely without hang ups. The
picture shows only the hooked part but keep in mind that from the hooked part
upward is about 2' of straight coat hangar. This will be used to go
through the Styrofoam head from the bottom of the head out through the top of
the head and will serve as the hangar for your ghost. We'll do this later.
 Bend
a loop in the end of each shoulder. Keep in mind what length you want the
shoulders to be before you bend the wire so you don't bend too much or too
little. You want to end up with proper length shoulders with hoops at the end.
I just measured myself and got dimensions that way. If you measure yourself or
someone else, you will then end up with life size, properly proportioned
measurements which is what you want.
Bend
a loop in the end of each shoulder. Keep in mind what length you want the
shoulders to be before you bend the wire so you don't bend too much or too
little. You want to end up with proper length shoulders with hoops at the end.
I just measured myself and got dimensions that way. If you measure yourself or
someone else, you will then end up with life size, properly proportioned
measurements which is what you want.
Straighten (2) lengths of coat hangar for the upper arms of your Ghost. Mine ended up being 14" long before I looped the ends to make the shoulder connection.
 Connect
your newly made upper arms to the shoulders by connecting your (2) loops
together. Make sure they move freely in each other for natural looking
movement. If they bind, your ghost will look "mechanical" later on.
Connect
your newly made upper arms to the shoulders by connecting your (2) loops
together. Make sure they move freely in each other for natural looking
movement. If they bind, your ghost will look "mechanical" later on.
 This
is what you end up with. The upper head mount, shoulders and upper arms.
This
is what you end up with. The upper head mount, shoulders and upper arms.
Straighten (2) lengths of coat hangar for the forearms of your Ghost. Mine ended up being 12" long before I looped the ends to make the elbow connection.
 Sorry
bout the poor clarity of this picture. Too much crap in the background but
you can see what needs to happen here. Shoulders, upper arms, and forearms all
connected with big loops as to make sure everything moves freely without
binding.
Sorry
bout the poor clarity of this picture. Too much crap in the background but
you can see what needs to happen here. Shoulders, upper arms, and forearms all
connected with big loops as to make sure everything moves freely without
binding.
 Measure
the distance in width from shoulder to shoulder and cut another straight piece
of hangar. Leave yourself some extra since you will need the piece to be
shoulder length AFTER you make 2 loops in it. This will be used to "stiffen" the
framework of our ghost.
Measure
the distance in width from shoulder to shoulder and cut another straight piece
of hangar. Leave yourself some extra since you will need the piece to be
shoulder length AFTER you make 2 loops in it. This will be used to "stiffen" the
framework of our ghost.
 Loop
each end of the stiffener so that it prevents the shoulder frame from Sagging
when weight (your ghost) is applied. Pictures show left and right sides of the
stiffener connected horizontally above the upper arm joint.
Loop
each end of the stiffener so that it prevents the shoulder frame from Sagging
when weight (your ghost) is applied. Pictures show left and right sides of the
stiffener connected horizontally above the upper arm joint.
 This
shows the installed stiffener. You can now see how the stiffener keeps the
shoulders from "sagging"
This
shows the installed stiffener. You can now see how the stiffener keeps the
shoulders from "sagging"
Your ghost frame is done!
Now, Get out your 10 yards of Cheesecloth.
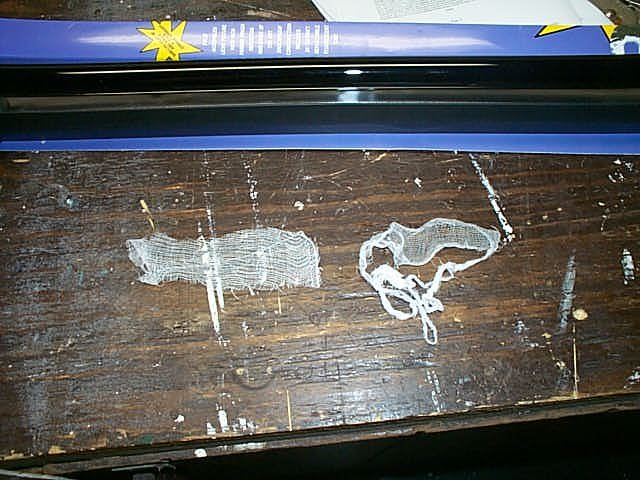
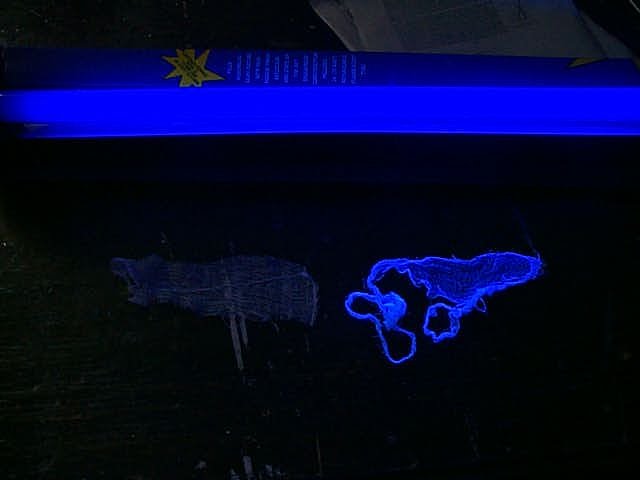 We
need the Cheesecloth to glow under black light so we will now "blue" the
cheesecloth. (it doesn't glow in it's un-altered state). The left is a picture
of 2 pieces of cloth. the left piece of cloth is untreated, the right piece has
been "blued". The right picture shows both the untreated and "blued" pieces of
cloth under black light. As you can see, un-blued cloth does not glow but the
"blued" cloth glows extremely well.
We
need the Cheesecloth to glow under black light so we will now "blue" the
cheesecloth. (it doesn't glow in it's un-altered state). The left is a picture
of 2 pieces of cloth. the left piece of cloth is untreated, the right piece has
been "blued". The right picture shows both the untreated and "blued" pieces of
cloth under black light. As you can see, un-blued cloth does not glow but the
"blued" cloth glows extremely well.
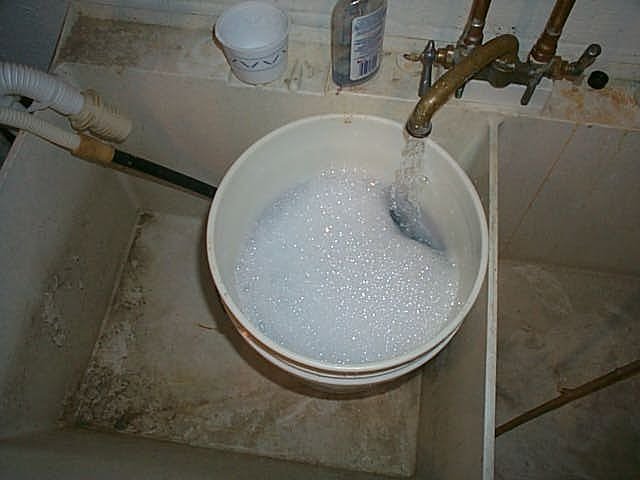
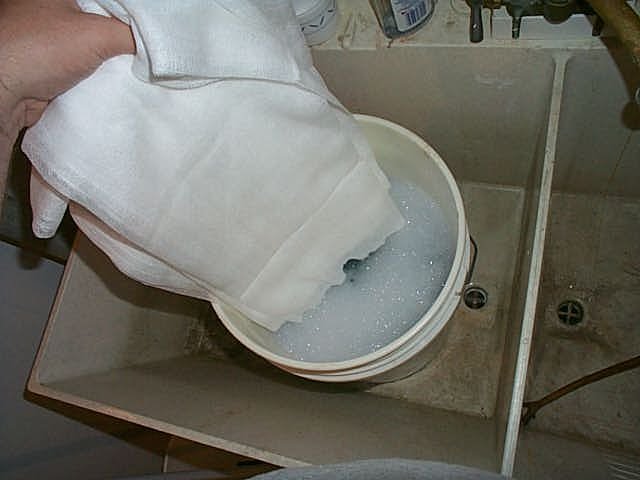 I used a 5 gallon bucket and put in 1 cup of laundry detergent. Fill the bucket
1/2 to 3/4 of the way up and mix the detergent in the water. Throw in ALL
of your cheesecloth and let it sit in the bucket for 5-10 minutes. I think
even 2 minutes would do but I did it for about 10 minutes and mine came out
fine.
I used a 5 gallon bucket and put in 1 cup of laundry detergent. Fill the bucket
1/2 to 3/4 of the way up and mix the detergent in the water. Throw in ALL
of your cheesecloth and let it sit in the bucket for 5-10 minutes. I think
even 2 minutes would do but I did it for about 10 minutes and mine came out
fine.
After 10 minutes, thoroughly rinse your cloth to get all of the soap out and throw it in the dryer. Don't worry about it wrinkling or tangling up, the dryer actually straightens it out nicely. Don't put it on HIGH heat... just a warm setting and let it dry completely.
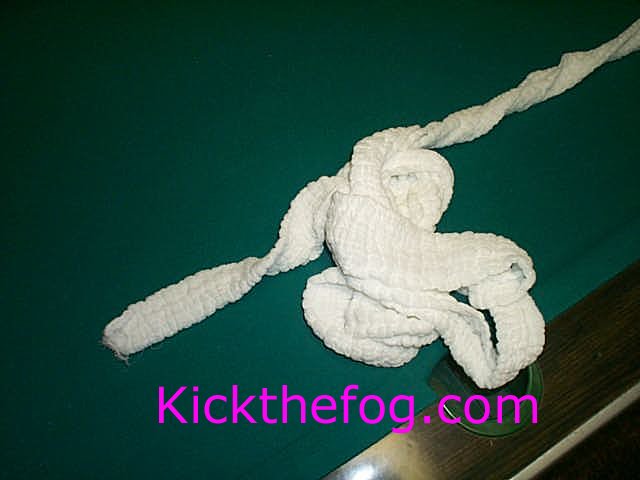 It
will come out looking wavy but this actually adds to the effect.
It
will come out looking wavy but this actually adds to the effect.
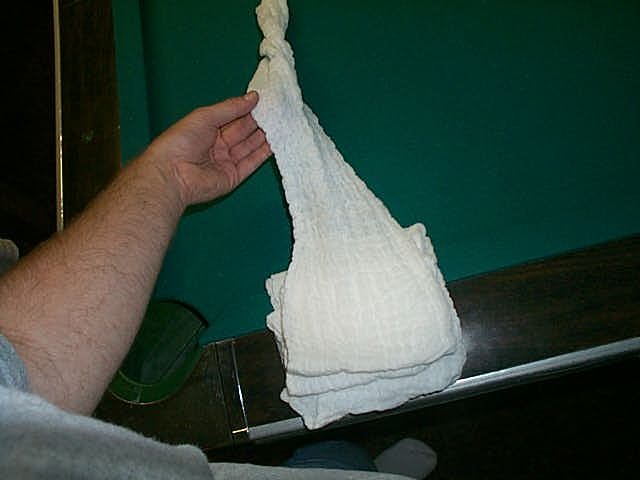 Gently
stretch and refold your cloth so it is manageable. If you want to go nuts, you
can iron it if you want to have it completely smooth again (I didn't).
Gently
stretch and refold your cloth so it is manageable. If you want to go nuts, you
can iron it if you want to have it completely smooth again (I didn't).
Set the cloth aside for now and grab your Styrofoam head.
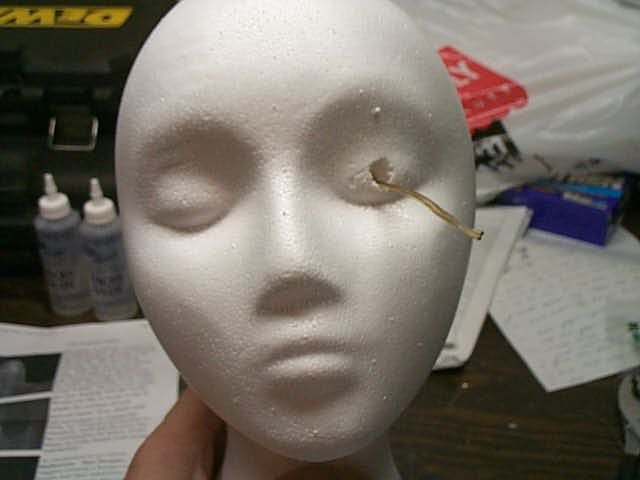
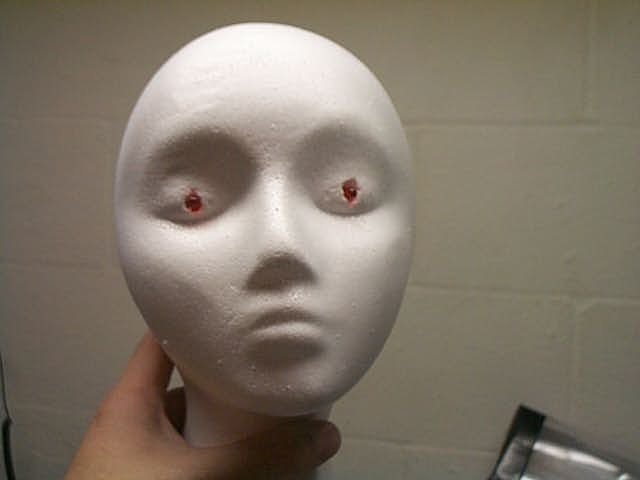
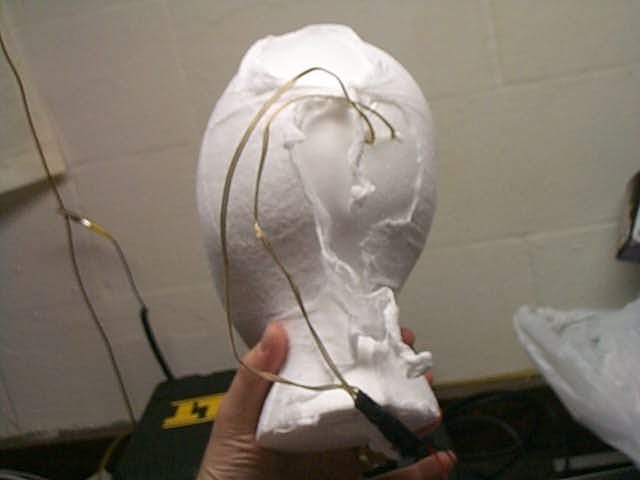
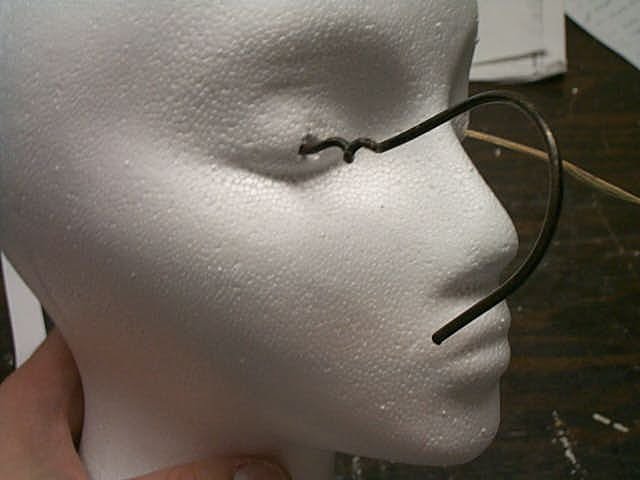 Use
yet another coat hangar that you have straightened to poke an eye hole
completely through the head so that the hangar comes out of the rear of the
head.
Use
yet another coat hangar that you have straightened to poke an eye hole
completely through the head so that the hangar comes out of the rear of the
head.
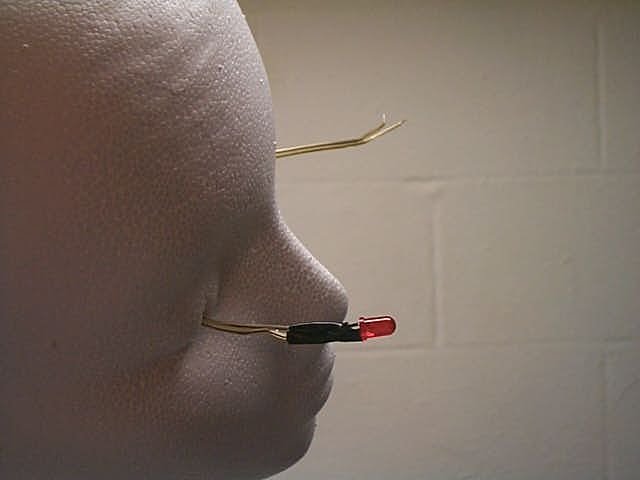
Now remove the hangar from the hole you just made and insert the hangar through the hole you just made although this time insert it from the back of the head through the eye. This is kinda tricky but if you push gently while wiggling, you will find your way through ok. It helps to have a hanger that is straight as possible.
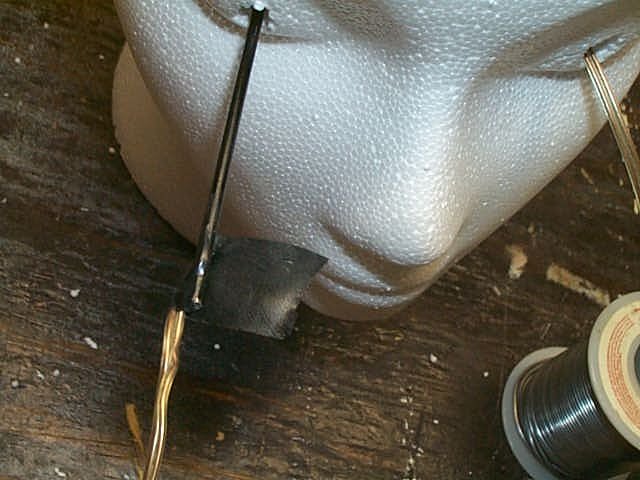 Now
attach a length of wire to the coat hanger using some tape and pull the wire
through the head and leave wire exposed on both ends. Do steps 20-22 for both
eyes.
Now
attach a length of wire to the coat hanger using some tape and pull the wire
through the head and leave wire exposed on both ends. Do steps 20-22 for both
eyes.
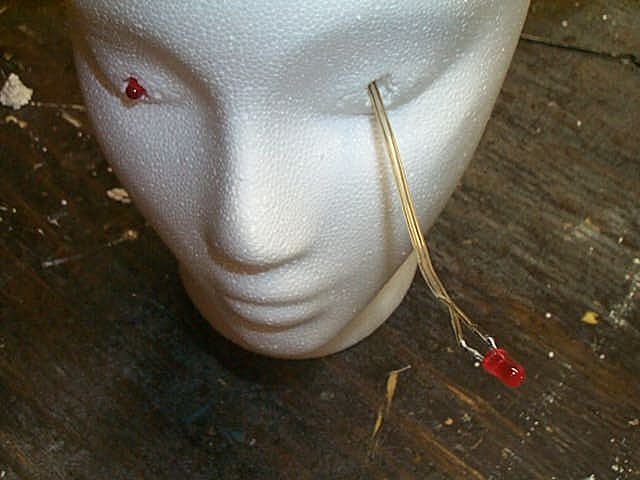
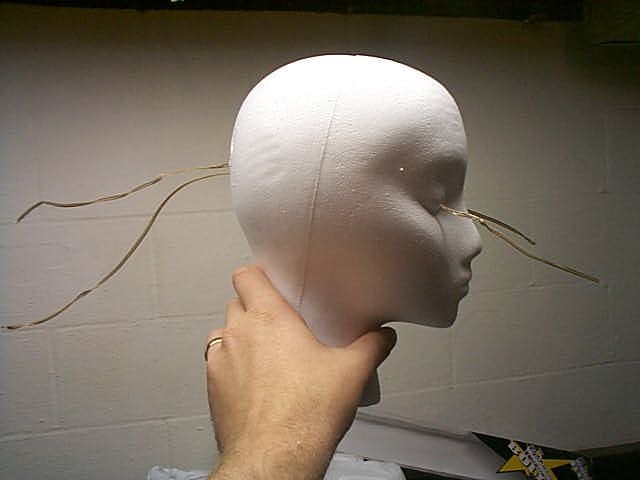 Here
is a pic of both wires pulled through the head.
Here
is a pic of both wires pulled through the head.
We're now ready to wire the LED's
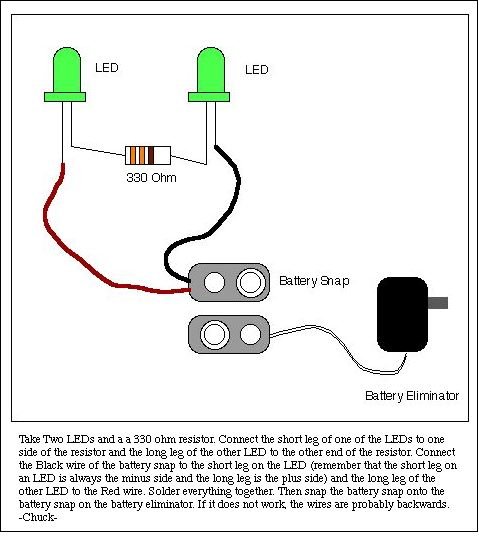 Use
this diagram to wire your LED's. (Diagram courtesy of Chuck
Rice)
Use
this diagram to wire your LED's. (Diagram courtesy of Chuck
Rice)

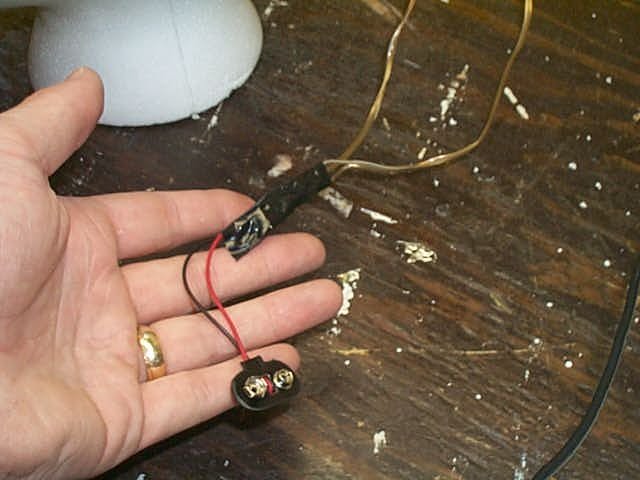
Following the diagram I wired then taped up the led's and all exposed wiring to
keep it from shorting. After they are taped, pull the wires back through the
head till the eyes sit nicely in the eye holes.
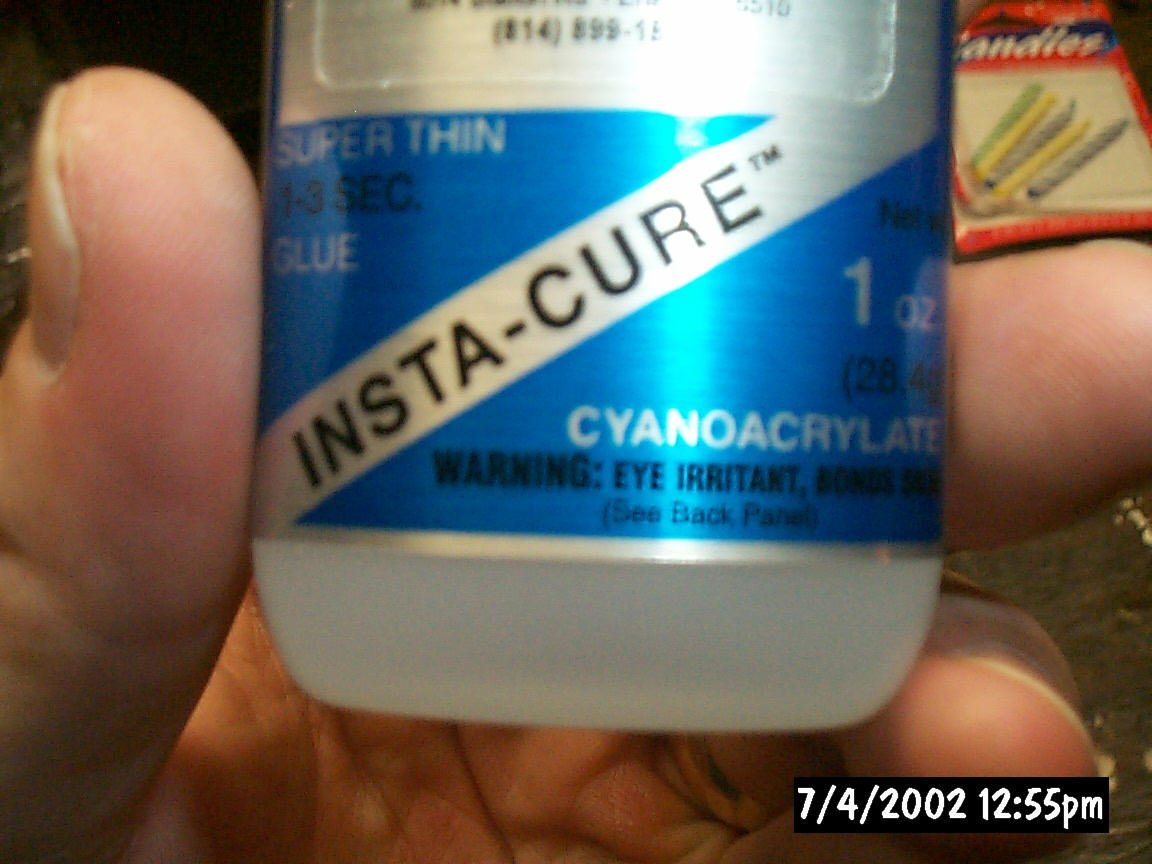
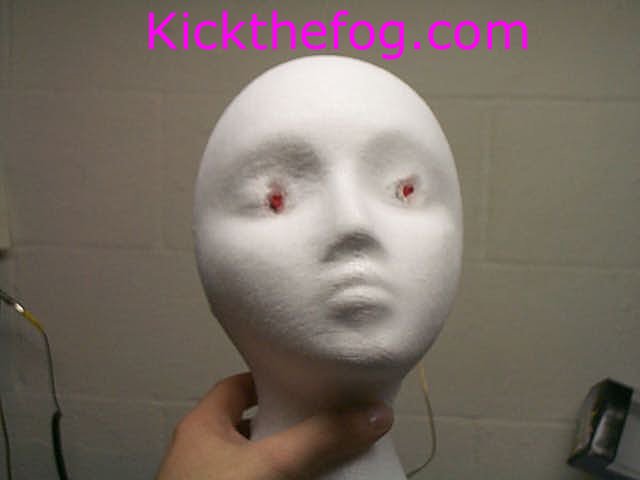
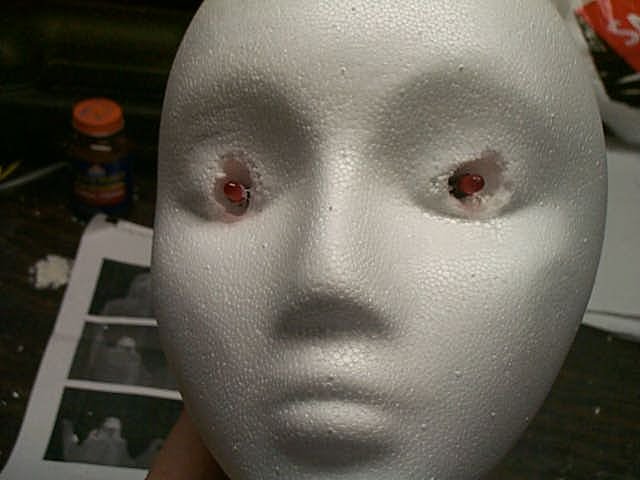 At
this point I glued the eyes into the head. BUT, I found out the hard
way....DON'T USE CYANOACROLATE (super glue) on Styrofoam! It just eats it
away and now my eye holes are bigger than I first desired.
(picture one shows before super glue...picture 2 shows after) Use
some of your tacky glue to glue the eyes.
At
this point I glued the eyes into the head. BUT, I found out the hard
way....DON'T USE CYANOACROLATE (super glue) on Styrofoam! It just eats it
away and now my eye holes are bigger than I first desired.
(picture one shows before super glue...picture 2 shows after) Use
some of your tacky glue to glue the eyes.
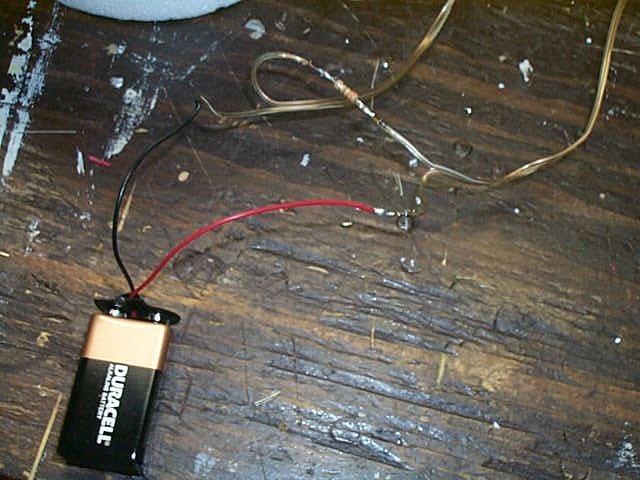
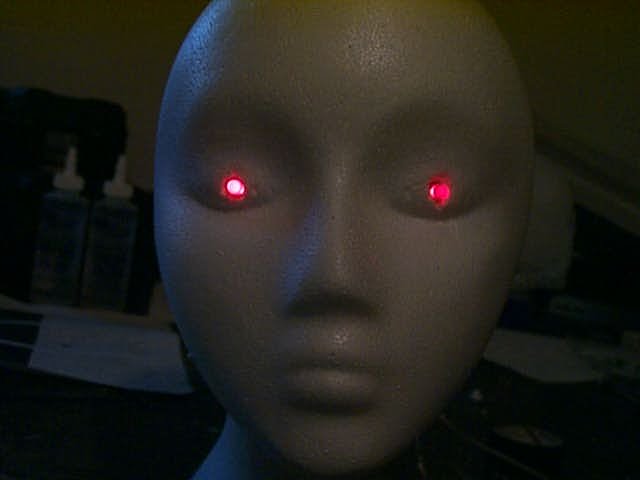 Throw
a fresh 9 volt on the Battery snap and watch the eyes light up!
Throw
a fresh 9 volt on the Battery snap and watch the eyes light up!
OK, Now were are going to cover the head with cheesecloth.
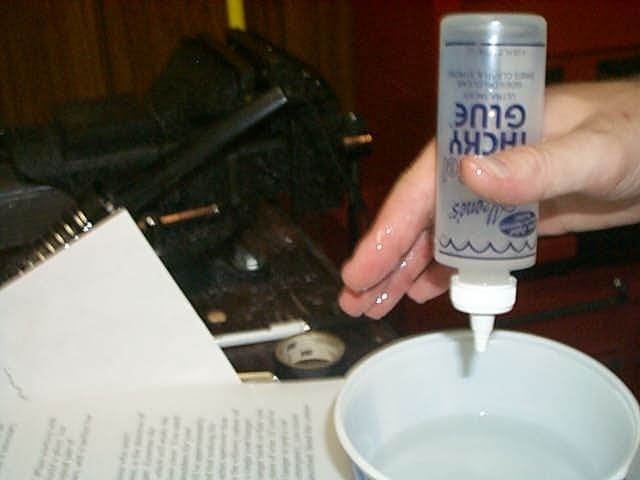 We
need to thin the glue for this next step. I put an entire 4oz bottle of
Tacky Glue into a cool whip bowl. Filled the bowl halfway up with water.
Stir until the glue is well mixed with the water. (you can see
I used my fingers to stir!)
We
need to thin the glue for this next step. I put an entire 4oz bottle of
Tacky Glue into a cool whip bowl. Filled the bowl halfway up with water.
Stir until the glue is well mixed with the water. (you can see
I used my fingers to stir!)
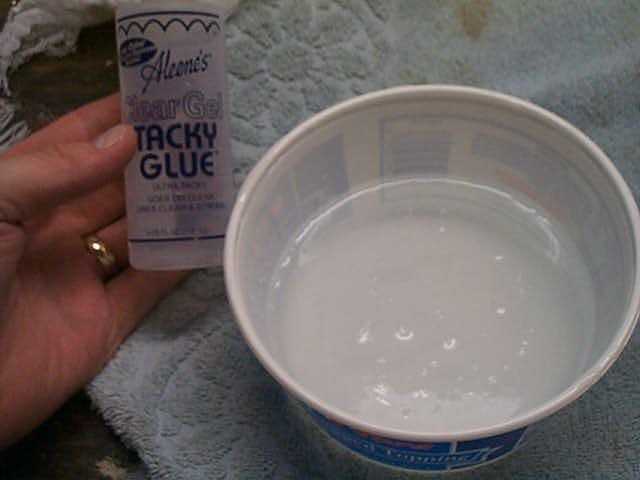 You
end up with a thick but semi-runny glue mixture. this is why it's critical to
use a WATER-BASED glue here.
You
end up with a thick but semi-runny glue mixture. this is why it's critical to
use a WATER-BASED glue here.

 Cut
a piece of cheesecloth big enough to fit over the entire head and dip it into
the glue mixture. Place the Glue soaked cloth over the head and pull it
snug so that all the excess is behind the head so it will not be seen. you can
always dip your fingers into the glue to re soak areas to get them to tightly
stick to the areas you wish them to. This is particular important since
you want her expression to come through. Let it dry completely. Trim
excess after it's dry.
Cut
a piece of cheesecloth big enough to fit over the entire head and dip it into
the glue mixture. Place the Glue soaked cloth over the head and pull it
snug so that all the excess is behind the head so it will not be seen. you can
always dip your fingers into the glue to re soak areas to get them to tightly
stick to the areas you wish them to. This is particular important since
you want her expression to come through. Let it dry completely. Trim
excess after it's dry.
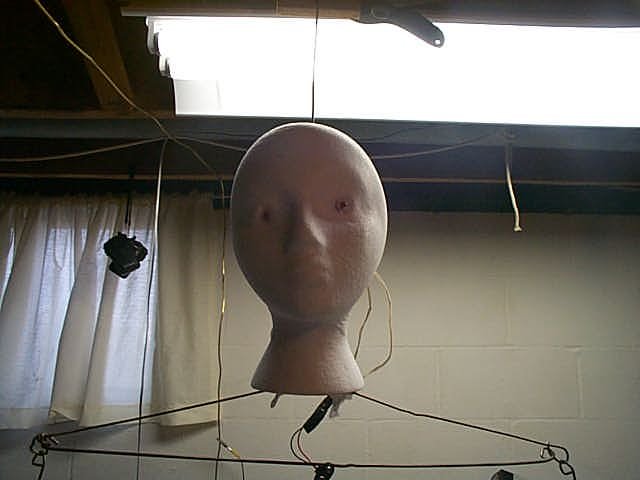 Now
you have a finished head that can be mounted on it's frame. Do so by
poking your 2' wire through from the bottom of the head out through the top. Be
careful not to cut or break the eye (led) wires when doing so. After your head
is resting on it's shoulders you can cut and curl the top of the 2' piece of
hanger and fashion a hook for suspending your ghost.
Now
you have a finished head that can be mounted on it's frame. Do so by
poking your 2' wire through from the bottom of the head out through the top. Be
careful not to cut or break the eye (led) wires when doing so. After your head
is resting on it's shoulders you can cut and curl the top of the 2' piece of
hanger and fashion a hook for suspending your ghost.
Now it's time to cover the frame of your ghost with your remaining cheesecloth.
Since I cannot possibly explain it any better than the originators of this wonderful prop, here are the directions they give for covering your ghost. I followed them exactly EXCEPT FOR THE HANDS. I'll talk more about this is a second.
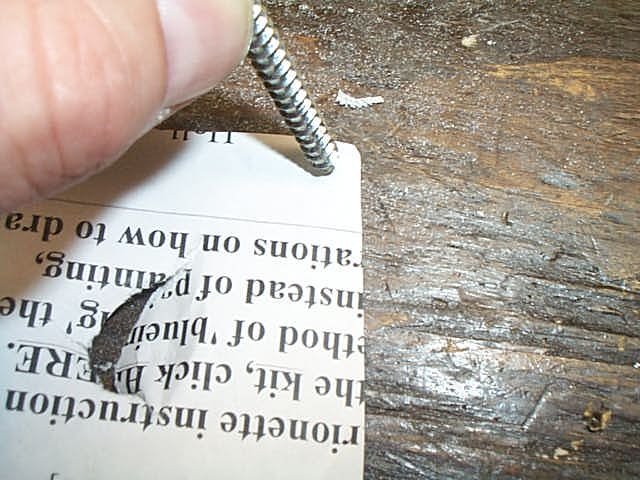
Here's the "how to" I used to drape my ghost.
 I
know you can't read this well when viewing it, but it looks fine when
printed. So print it!
I
know you can't read this well when viewing it, but it looks fine when
printed. So print it!
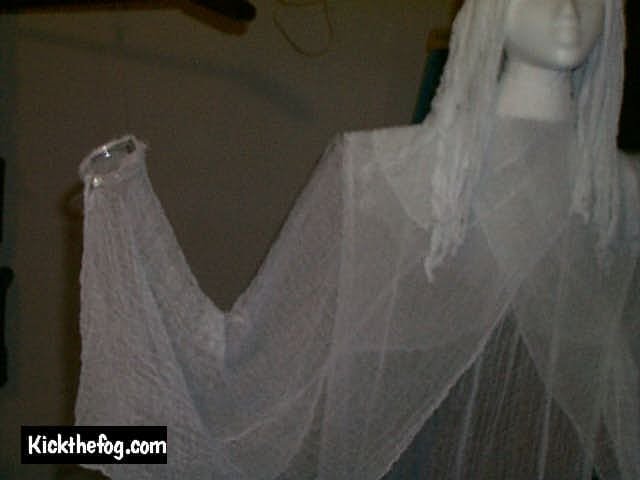
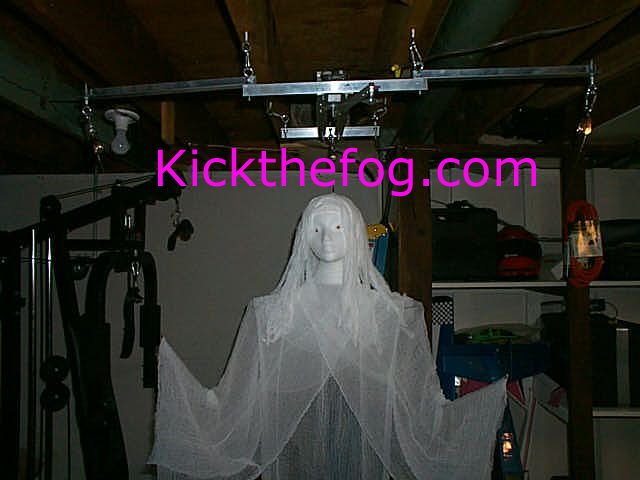
 This
is a picture of my ghost draped with no hands and no hair (obviously).
This
is a picture of my ghost draped with no hands and no hair (obviously).
I tried the hands and they ended up looking quite stupid. I mean, The ghost is beautiful, she's flowing, somewhat transparent with no body, no arms, no legs...AND THESE BIG GOOFY FRIGGIN HANDS! SO... I did away with them and did the following.
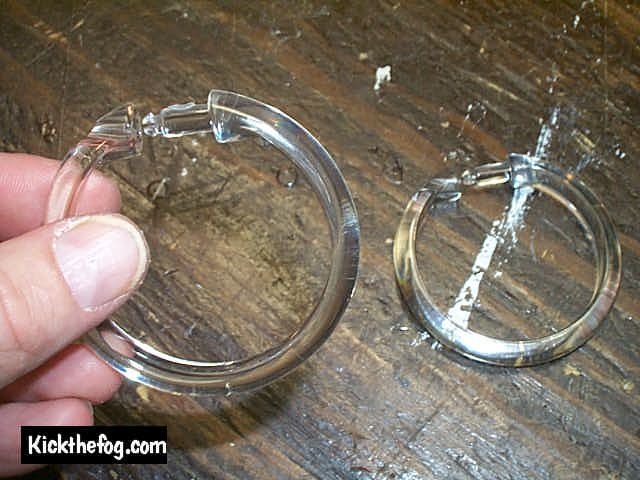 I
used Clear plastic shower Curtain clips for "wrists". This makes a form
and looks like there is an arm there but there is no arm there. Makes a
great added effect I think.
I
used Clear plastic shower Curtain clips for "wrists". This makes a form
and looks like there is an arm there but there is no arm there. Makes a
great added effect I think.
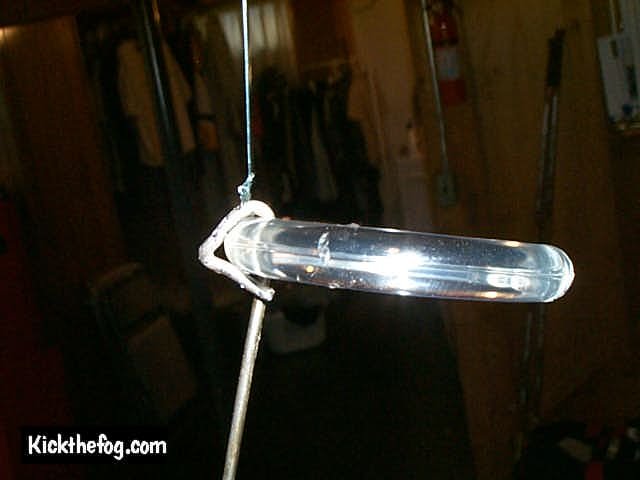
 As
you can see, I secured the ring by bending the end of the arm around the ring.
I then wrapped the end of the arm cloth around the ring and glued it with some
of the diluted glue I had left over.
As
you can see, I secured the ring by bending the end of the arm around the ring.
I then wrapped the end of the arm cloth around the ring and glued it with some
of the diluted glue I had left over.
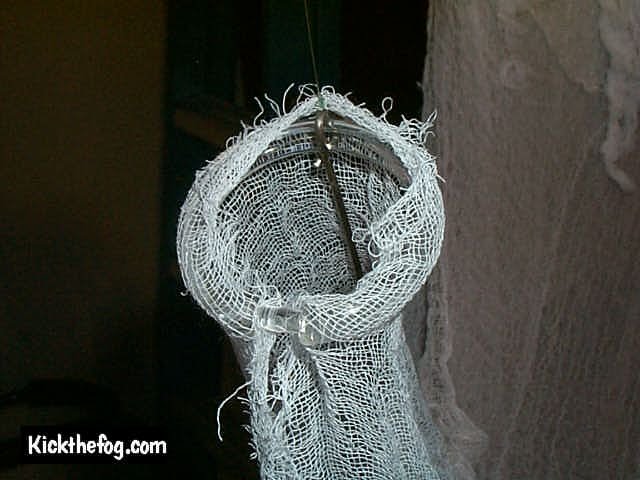
 As
you can see, the curtain rings give some shape to the forearm and give the
illusion that there is an invisible arm "filling" the cloth. Looks very
cool in the dark.
As
you can see, the curtain rings give some shape to the forearm and give the
illusion that there is an invisible arm "filling" the cloth. Looks very
cool in the dark.
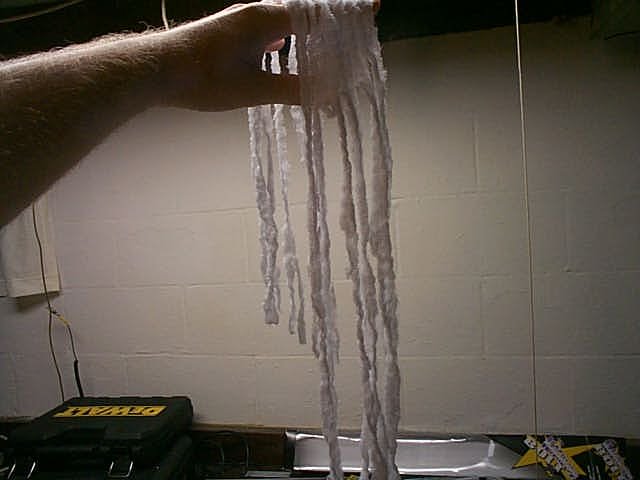 I then
cut up a bunch of the cloth into strips to make hair. I cut everything all the
way up but left all the strips connected in the middle so that placing it on the
head was easier. I then added strips like crazy and used all but just a pinch of
the 10 yards till I had the hair I was looking for.
I then
cut up a bunch of the cloth into strips to make hair. I cut everything all the
way up but left all the strips connected in the middle so that placing it on the
head was easier. I then added strips like crazy and used all but just a pinch of
the 10 yards till I had the hair I was looking for.
Time to hang your ghost!
I hung my frame from my basement using eye bolt screws and quick
connects.
 OK,
here is where we talk about pulley's. In the beginning I said that you may
or may not use all of the pulley's. I chose to use a pulley for the ghost body
but not the arms. This was because that the arms move around a lot and
don't weigh much and since I used fishing line, the line seemed to run better
just by going through the eyebolt alone. For the Ghost body however, The
pulley worked very well. It's up to you.
OK,
here is where we talk about pulley's. In the beginning I said that you may
or may not use all of the pulley's. I chose to use a pulley for the ghost body
but not the arms. This was because that the arms move around a lot and
don't weigh much and since I used fishing line, the line seemed to run better
just by going through the eyebolt alone. For the Ghost body however, The
pulley worked very well. It's up to you.
 Here
is a picture of her suspended from the frame using fishing line. Here head
is supported by a line running from her head...to the rear eye bolt with
pulley... and on to one of the 3 holes in the crank arm fender washer.
Each of her arms are supported the same way. The line goes from the end of the
ghost arm to the eye bolt on the end of the frame arm to the remaining 2 holes
on the crank arm fender washer.
Here
is a picture of her suspended from the frame using fishing line. Here head
is supported by a line running from her head...to the rear eye bolt with
pulley... and on to one of the 3 holes in the crank arm fender washer.
Each of her arms are supported the same way. The line goes from the end of the
ghost arm to the eye bolt on the end of the frame arm to the remaining 2 holes
on the crank arm fender washer.
The length of the line is just an experiment thing. Different length lines and different platform arm positions will give you different effects. Experiment...that's half the fun!
THAT'S IT! SHE'S READY TO ROLL!
CONGRATULATIONS!
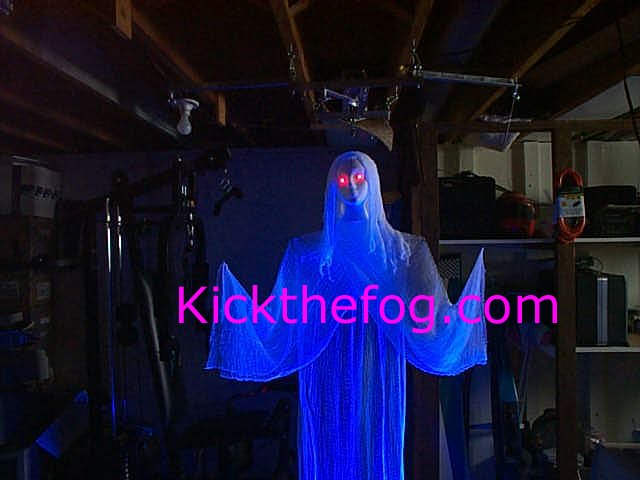 Fire
up the black light, plug in the motor and see what happens!
(this picture was taken before I installed the shower curtain wrists).
Fire
up the black light, plug in the motor and see what happens!
(this picture was taken before I installed the shower curtain wrists).
Click here to see my Ghost in
action.
It is 5.2 megs so you may wish to right click on the above link and choose "save
as".
My Camcorder sucks in the dark so I apologize for the quality
in advance. The ghost was on the inside of the house being filmed from the
outside through the window at distance of about 15 feet.
So there you have it! My version of the classic and beautiful Flying Crank Ghost!
Back to Kickthefog.com Back to Halloween Section